cnautotool offical blog
the blog of www.cnautotool.comcnautotool offical blog
the blog of www.cnautotool.comCAT ET III Caterpillar Scanner Feature
CAT ET III Caterpillar Scanner Features:
Display graph and log status parameters.
Retrieve prognostic data including histograms, engine totals for fuel used and miles traveled.
View active diagnostics and clear logged diagnostics. View events where
irregularities have occurred and have been logged by the ECM.
Perform calibrations to enhance performance of the ECM.
Customize the ECM with application-specific settings.
Over 100 custom Diagnostic, Information and Service features including:
2D and 3D Histogram plotting capability (engine software support required).
Custom Status screen groups
Snapshots (Download and display snapshot data recorded by the ECM)
Configuration Aid that allows upload/download of same configuration to multiple control modules
Customised Service Tool Options
Customized service tool name
Customized graphics for the splash screen and icons
Customized installation
Aftermarket differentiation, the tool for one customer does not work on the product of another customer.
Licensing options for customer management
Flash programming of the ECM(s)
Training demonstration allows familiarity with the toola s primary functions without connecting to ECM(s)
Major operating systems support (Microsoft Windows 95, 98, NT 4.0, 2000, ME, & XP)
Perform customized diagnostic tests to identify harness problems,
cylinder or component failures (Automatic Cylinder Cutout with cylinder
to cylinder fueling comparison)
Designed to run with Microsoft Windows 95, 98, 2000, NT and XP
Ready to use, just install software program onto PC using provided CD
The PC-based service tools from Caterpillar provide the capability to access Electronic Control Modules (ECMs) from a personal computer. Many job-critical tasks can be performed with an electronic service tool.
The user can display the status of a group of parameters (temperatures, pressures, etc.) simultaneously, view active and clear logged diagnostics, display the current configuration of an ECM and much more.
The service tool works with a communication adapter to allow connection to an ECM. A graphical interface makes this software quick to learn and easy to use. The version and identification of the ECM is automatically retrieved and is displayed on a summary screen when the program is started.
Diagnostic tests and calibrations can also be performed.
Caterpillar PC-based tools enable service technicians to reprogram ECMs,
reconfigure control system parameters, fine tune performance or
diagnose the root cause of a failure the first time. These powerful
tools allow service personnel to display and analyze vital performance
and health information from any system quickly and accurately.
The service tool communicates with any system using ATA (J1708), J1939 or the Caterpillar proprietary data link networks. The service tools provide information and features needed to help a technician diagnose problems and perform repairs and to customize and personalize the operation of a product.
By allowing customers to design flexibility and configurability into a product, Caterpillar service tools stretch beyond the capabilities of preprogrammed ECMs or onboard display systems.
Software version: 2019C
2019C Caterpillar ET3 Adapter III Communication:
1. Allows communication between service tools and engine controls
using various data links such as J1939/11, DeviceNet (future release),
CAT DataLink, and J1708 (ATA) vehicle networks;
2. Flash program allows adapter firmware upgrades as additional features become available;
3. Uses J1939/11, high-speed data link (part of ADEM III controls), substantially reducing flash times;
4. Automatically selects J1939/11 when flashing the engine (reduces the
flash time approximately 80%, from 14 minutes to 3 minutes).
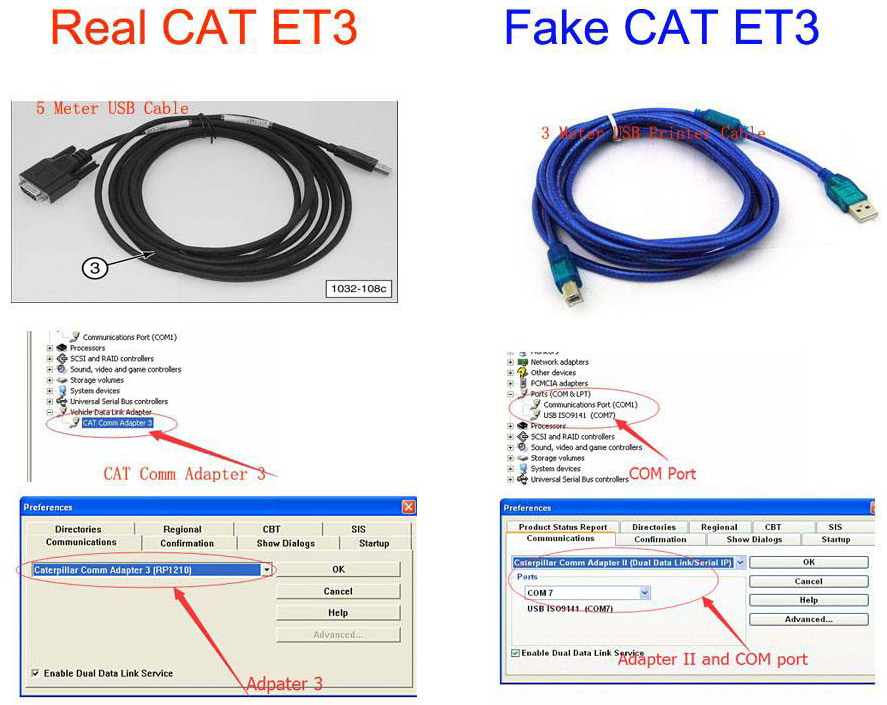
Original Factory Caterpillar ET3 Adapter III Compare With OEM Caterpillar ET Diagnostic Adpater III
1. Original Factory CAT ET can use once pluged, no need install the USB
drive, the software can automatic realize it for ET3 Adapter, and the
machine can automatic weld the high quality Circuit board, quality will
be more reliable.
2. The OEM Caterpillar ET Diagnostic Adapter III need use USB Drive to
install, and need choose the COM Port, and in the software ET also need
choose ET2 then can be used.
The Details as follows:
XTOOL A80 Full-System full-brand diagnostic tool reviews
XTOOL A80 Full System Car Diagnostic tool reviews language, car list, function list, register, update etc.
XTOOL A80 Language:
Available: English Spain Italy Malaysia Spanish French Russian German Polish Portuguese Arabic
The default language is English.
Offer the machine serial number to the dealer to reset any of the above languages.
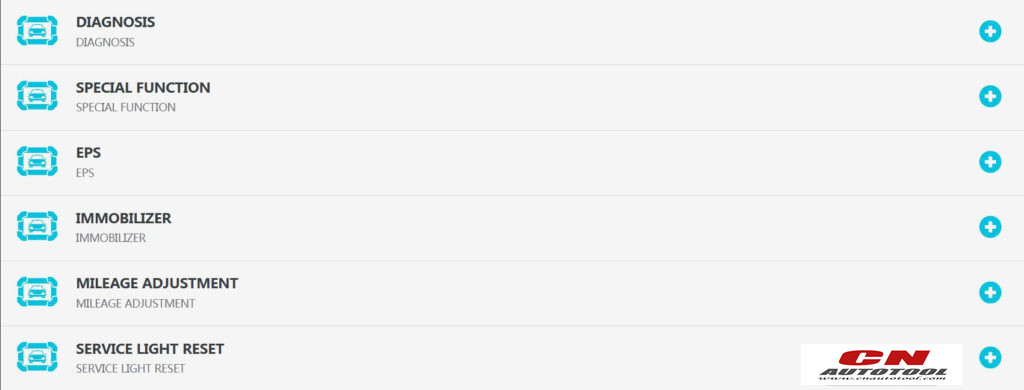
XTOOL A80 success list:
Diagnosis …confirmed
Special function …confirmed
EPS …confirmed
IMMOBILIZER …confirmed
Mileage adjustment …confirmed
Service light reset …confirmed
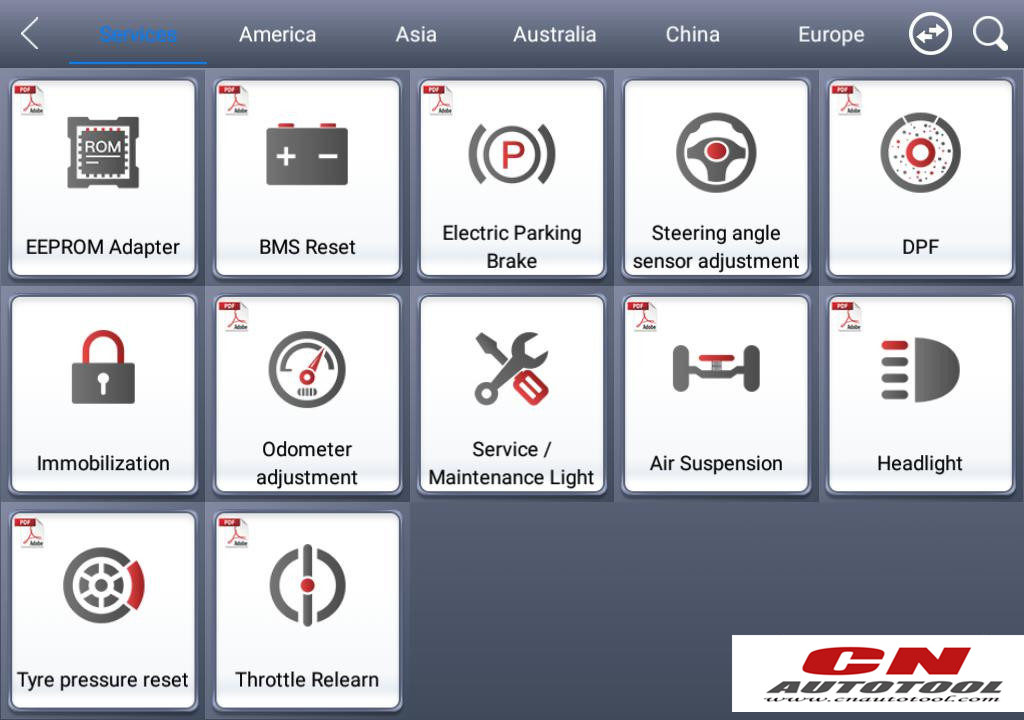

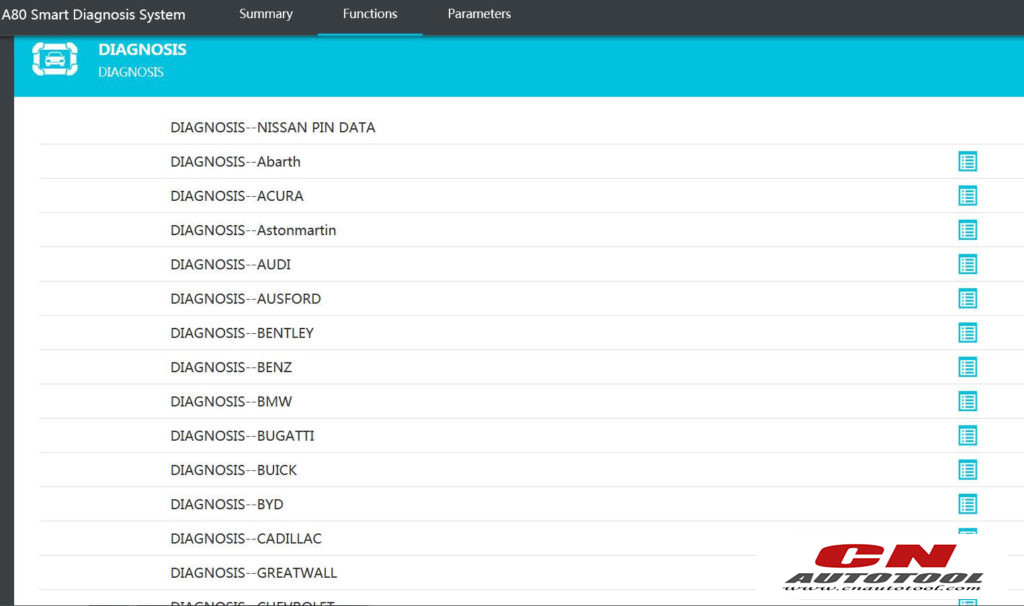
XTOOL A80 coverage and function list
Question: Does Xtool A80 program VW Polo (2015) all keys lost?
Answer: use VW 4th and 5th IMMO option to program.
Question: Does Xtool A80 support Smart 453 odometer correction?
Answer: No. it doesn’t.
XTOOL A80 activation:
Issue one: after entering gmail address, the activation was
finished. But when upgrading, got the error message “Not support this
language to update!”, the language to reset is Italian.
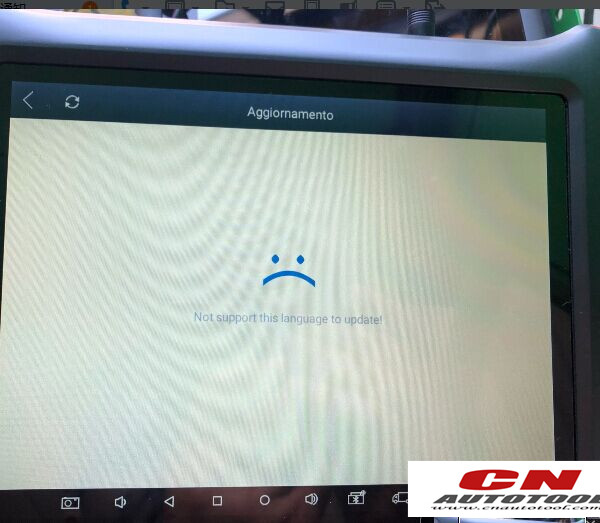
Solution:
Contact the dealer if the language is reset ok, if yes, please reset the tablet language as Italian, and also reset APP language as Italian.
Issue two:
When active Xtool A80, got error “Submission information is incomplete”.

Solution: please use the popular email to active, i.e gmail.
XTOOL A80 activation procedure:
In order not to affect the using and upgrading of newly released
software, please be sure to activate A80.
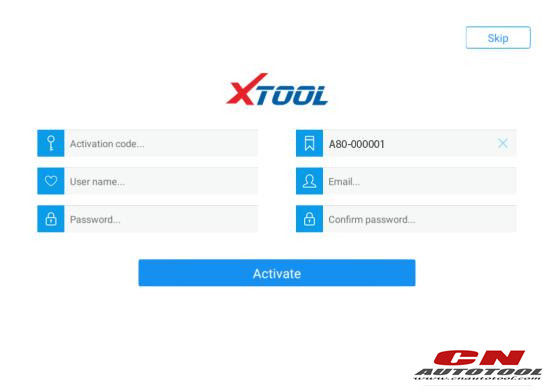
1.First turn on the A80 BT host, enter the tablet setting function to
enable the WLAN function, and connect to the wireless network. Click
the A80 BT Diagnostics icon to activate the page: 1. Enter the
activation code on the certificate.
2.Enter the six digits after the S/N code on the certificate
3.Enter auser name, such as A repair shop.
4, please enter the correct format of the mailbox account.
5 and 6, please enter a consistent custom password in the two columns.
After clicking the activation, you will be prompted to verify the mobile
number. Please enter the mobile number, receive the SMS verification
code, and enter the verification code in A80 BT.
Note: In order to improve A80 BT, every time period, Xtool will update A80 BT, pop up the update box directly on the diagnosis interface, click to install.
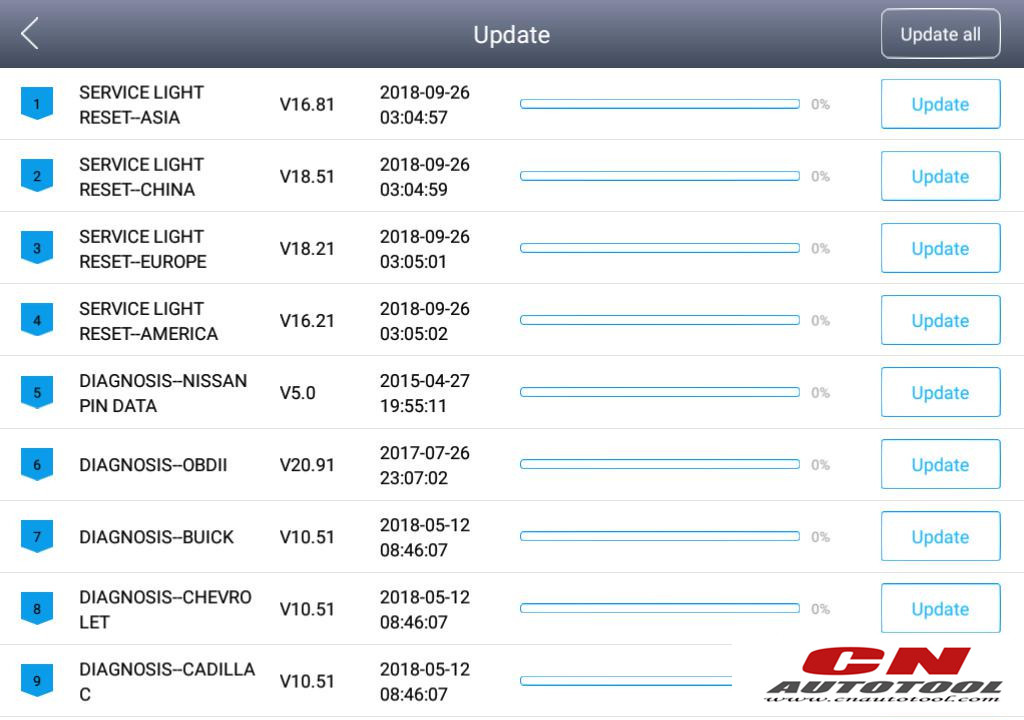
XTOOL A80 update:
Question: Does Xtool A80 update free lifetime?
Answer: No limitation to update time.
The A80 BT device no longer requires a card to be upgraded, just open the app and click Upgrade.
To be continued…
Durametric coding Possible with Porsche PIWIS cable
The Porsche PIWIS 3
(PST3) is the newest Diagnostic Tool in the market. It can read trouble
code, clear trouble code, shows ECU information. It test live data,
display actual values, and programs. On all; process malfunction
navigation, showing all interior circuit diagram.
Durametric coding instruction:
The Coding option provides a
way to back-up, restore, and change settings within supported control
units. For example, you can save the settings of an old control unit you
must replace and restore those settings to a new control unit.
Durametric relies on internal part numbers and metrics to ensure you do
not restore settings to unintended, incompatible control units.
Coding options on supported control units vary.
To backup control unit settings:
1.Select a model.
2.Select a control unit that supports coding.
3.Select Coding.
4.Review the warning statement.
5.If you acknowledge the warning statement, click I understand the risks (proceed with coding).
6.On the Backup / Restore tab, click the Backup button.
The Save As dialog appears. The program uses an XML file to save the backup settings. By default,
the program names the file the same as the selected control unit and saves the file to the My Documents (or Documents) folder.
7.Save the XML. Note the save location and filename for future reference.
To restore saved control unit settings:
1.Select a model.
2.Select a control unit that supports coding.
3.Select Coding.
4.Review the warning statement.
5.If you acknowledge the warning statement, click I understand the risks (proceed with coding).
6.On the Backup / Restore tab, click the Restore button. The Open dialog appears.
7.Browse to the location of your backup files.
8.Select an applicable backup file.
9.Click the Open button. The program then restores the settings to the control unit.
To edit control unit settings:
1.Select a model.
2.Select a control unit that supports coding.
3.Select Coding.
4.Review the warning statement.
5.If you acknowledge the warning statement, click I understand the risks (proceed with coding).
6.Select the Coding tab. Editable options will appear.
7.Edit the settings as necessary. Settings changes take effect when you move the cursor to another field.
To do coding with Piwis cable:
Coding is available in the Professional kits or VXDIAG Porsche Piwis III:
In
the Coding/Adaptation function group, it is possible to read the coding
of control units and also to change the coding if the user has the
corresponding permissions.
If you have selected at least one
control unit in another function group (A), you can access the list of
coding modes (B) by selecting the Coding/Adaptation function group.
You can access the different working screens after selection of a coding mode:
If
you have selected manual coding without MCR (C) and confirmed this with
<F12> (H), you can now set and write coding values (I). You can
return to the list of coding modes with <F11> (G).
If you
have selected manual coding with MCR (D) and confirmed this with
<F12> (K),you must enter the vehicle data in the screen that is
then displayed (L). You can return from here to the list of coding modes
with <F11> (J).
When you have entered the vehicle data,
you can access a screen for assignment of the valid equipment features
by pressing <F12> (N). If you press the <F11> button (M) in
this screen, you return to the vehicle data input screen.
After
you have assigned the equipment features, you then access a screen where
you confirm that the vehicle data is correct by pressing <F12>
(O). If you press the <F11> button (P) in the confirmation screen,
you return to the screen in which you have to assign the valid
equipment features.
If you confirm that the data is correct with <F12> (Q), the codings are then written (R).
If
you have selected one of the automatic coding modes (Automatic coding
with MCR or Reset to factory settings) and confirmed this with
<F12> (T), you must confirm the vehicle data with <F12> (Q)
(back to list of coding modes with
<F11> (S)). The codings are then written (R).
In addition, you can also call up a different function group by selecting one of the function group buttons in the menu bar (U).
CAT ET Diagnostic Adapter III Caterpillar Scanner Adapter 3
CAT Caterpillar ET Diagnostic Toolenable
service technicians to reprogram ECMs, reconfigure control system
parameters, fine tune performance or diagnose the root cause of a
failure the first time. These powerful tools allow service personnel to
display and analyze vital performance and health information from any
system quickly and accurately. The service tool communicates with any
system using ATA (J1708), J1939 or the Caterpillar proprietary data link
networks. The service tools provide information and features needed to
help a technician diagnose problems and perform repairs and to customize
and personalize the operation of a product. By allowing customers to
design flexibility and configurability into a product, Caterpillar
service tools stretch beyond the capabilities of preprogrammed ECMs or
onboard display systems.
CAT ET Adapter III FAQ:
Q1
:Is the Cat Comm III compatable with the software CAT caterpillar ET
2019C Is this an actual caterpillar part or a knock off? Thanks
A1:
Yes, this is actually the genuine CAT adapter,It is also the ONLY
recommended adapter for CAT ET, but obviously other ones will work. It
will work fine for the version you have, and 2011C is actually the
newest version.
Q2:What is the difference between a cat comm II
& Cat Comm III. Is one just a usb connection and one serial?
Also, will this unit work with my Cat 3126B marine units? Seriel no.
3GS01797 Thanks
A2:CAT Comm II was a serial port model, but since
computers are no longer made with serial ports, they changed the design
to a USB and called it a CAT Comm III. So you are correct. This unit
works with all CAT engines — Marine, on-highway, and off-highway. On
Marine units, I’m not sure where they put the plug, but it should be
somewhere near the ECM (Typically). It should be either a 6 pin or 9 pin
connector.
Q3: Does this work with CAT 3500 natural gas engines and 3600 natural gas engines? Thanks.
A3: If those programs use CAT Electronic Technician (CAT ET) for the software, it will work.
Q4: Can the cat communicate3 also be used to read detroit and cummins engines if I have the correct software?
A4:Yes,
it reads both J1708 and J1939 so it can read both of those. Keep in
mind that this adapter only comes with the J1939 adapter end, so I would
recommend purchasing the J1708 adapter end from me as well if you plan
on connecting to some older stuff.
Q5:will this unit allow me all
access to the ecm to alter all areas eg set speed limiter to a lower
speed and is there a yearly lic fee.
A5: This device is what you
should use if you will be hooking up to both off-highway &
on-highway CAT engines. If you are strictly wanting to work on
on-highway CAT engines, I would rather see you purchase a Nexiq USB Link
.The Nexiq USB Link is universal (Works with CAT, Cummins, Detroit,
Allison, etc…), it is cheaper, plus it has bluetooth so you can go
wireless.
Q6: want to compare the communicator and some caterpillar ECMS could tell me if it works with them.
A6: This item works with all CAT ECMS — Off Road and On Highway, trucks and equipment
if you have any suggestions about cat et diagnostic adapter iii, please leave us message or visit our website and contact us: sale@cnautotool.com
Latest Version CAT Caterpillar ET Diagnostic Adapter III Display Status of All Parameters
CAT Caterpillar ET Diagnostic Adapter III retrieve engine totals for fuel used, miles traveled, and hours Operated. CAT Caterpillar ET Diagnostic Adapter display status of all parameters, such as engine speed, Throttle position, timing advance, fuel flow, etc.
Caterpillar ET 2019C (replaces CAT ET 2018b, 2019A,2019B) Electronic Technician Diagnostic Software :
Brand: Caterpillar
Region: WorldWide
Support Multi-languages:English, Chinese, Danish, French, German, Italian, Japanese, Portuguese, Russian, Spanish
Compatible
OS: Windows 7 32 bit, Windows 7 64 bit, Windows 8/8.1 32 bit, Windows
8/8.1 64 bit, Windows 10 32 bit, Windows 10 64 bit
Publication date: 10.2019 year
Support All cars of CAT
The
PC-based service tools from Caterpillar III provide the capability to
access Electronic Control Modules (ECMs) from a personal computer. Many
job-critical tasks can be performed with an electronic service tool. The
user can display the status of a group of parameters (temperatures,
pressures, etc.) simultaneously, view active and clear logged
diagnostics, display the current configuration of an ECM and much more.
The service tool works with a communication adapter to allow connection
to an ECM. A graphical interface makes this software quick to learn and
easy to use. A separate pull-down menu for each function enhances the
“ease of use.” The version and identification of the ECM is
automatically retrieved and is displayed on a summary screen when the
program is started. Diagnostic tests and calibrations can also be
performed.
All the details about the Cat Caterpillar ET Diagnostic Adpater III please feel free to contact with us:
www.cnautotool.com