cnautotool offical blog
the blog of www.cnautotool.comcnautotool offical blog
the blog of www.cnautotool.comJohn Deere Service Advisor
John Deere Diagnostic tool Support Languages: English, French, German, Italian, Portuguese, Russian, Spanish.
John
Deere Service Advisor Agriculture workshop service manual, repair
manual, electrical wiring diagram, hydraulic diagram, diagnostic,
assembly and disassembly engine, transmission.
John Deere AG
Management Solutions, Attachments, Backhoes, Combines and Headers,
Cotton Harvestings, Excavators, ForkLifts, Hay and Forages, MAte Hand
Cut and Shredderses, Plantings and Seedings, Skid Steers, Sprayers,
Sugar Cane Harvesters, Tillages, Tractors, Worksite Pro Attachments.
John Deere Service Advisor CF (Construction and Forestry), workshop
service manual, repair manual, diagnostic, electrical wiring diagram,
hydraulic diagram John Deere.
John Deere Service Advisor CCE (Commercial and Consumer Equipment)dealer technical assistance, diagnostics, connection readings, calibrations, interactive tests, specification, tools, assemble and disassemble presented all models John Deere Construction Equipment and some models Hitachi, Euclid, Bell and Timberjack.
V5.2 Software
Supports John Deere vehicles up to 2018
Size: 250 GB
Region: All regions
Type: Service and Repair Information
Version: V5.2
Service Advisor for John Deere contains:
Tractors
Tractor Attachments
Transmission
Combines and Headers
Cotton Harvesting
Cutting and Mowing
Harvester
Harvester Head
Hay and Forage
Landscaping
Mate. Hand Cut. and Shredders
Planetary Drive
Planting and Seeding
Scraper
Skid Steer
Loader
Compact Loader
4WD Loader
Snow Products
Sprayers
Sugar Cane Harvesters
Sugar Cane Planter
Tillage
Vertical Tillage
Utility Vehicles
Field and Crop Solutions
Golf and Turf Products
GPS Receiver
Guidance
Hydraulic Power Pack
Information Management
LG Attachments
Motor Inverter
OEM Engines
Commercial
Display
Excavator
Worksite Pro Attachment
Axles
AG
Apollo Series
Engine
Readings
Riding Lawn Equipment
Other
Boom
PTO
Telematics
John Deere 4WD Loader
John Deere Backhoe
John Deere Bundler
John Deere Compactor
John Deere Crawler
John Deere Delimber
John Deere Excavator
John Deere Feller Buncher
John Deere Felling Head
John Deere Forklift
John Deere Forwarder
John Deere Harvester
John Deere Harvester Heads
John Deere Landscape Loader
John Deere Log Loader
John Deere Logger
John Deere Mate. Hand Cut. and Shredders
John Deere Motor Grader
John Deere OEM Engines
John Deere Scraper
John Deere Skid Steer
John Deere Skidder
John Deere Slasher
John Deere Tractor
John Deere Tractors
John Deere Tree Harvester
John Deere Truck
John Deere Utility Vehicles
John Deere Winch
John Deere Worksite Pro Attachment
Model list:
John Deere 5720
John Deere 5820
John Deere 5620
John Deere 244J
John Deere 304J
John Deere JD904
John Deere JD1054
John Deere JD1204
John Deere JD1354
John Deere 70
John Deere 570
John Deere 40
John Deere 315
John Deere 240
John Deere 250
John Deere 260
John Deere 270
John Deere 3375
John Deere 4475
John Deere 5575
John Deere 6675
John Deere 7775
John Deere 8875
John Deere 60
John Deere 375
John Deere 328
John Deere 280
John Deere 70A
John Deere 44
John Deere 320
John Deere 575
John Deere 240 Series II
John Deere 250 Series II
John Deere 260 Series II
John Deere 270 Series II
John Deere 280 Series II
John Deere 332
John Deere 325
John Deere 51
John Deere 52
John Deere 67
John Deere 675
John Deere 675B
John Deere 313
John Deere 24A
John Deere 125
John Deere 317
John Deere CT322
John Deere CT332
John Deere CT315
John Deere 850
John Deere 260
John Deere 375
John Deere 385
John Deere 960
John Deere 900
John Deere 447
John Deere 7
John Deere 8
John Deere 8A
John Deere 10
John Deere 10A
John Deere 46
John Deere 485
John Deere 448
John Deere BH8
John Deere BH9
John Deere BH11
John Deere 911
John Deere BH7
John Deere 1905
John Deere 1200
John Deere 300
John Deere 305
John Deere 300CX
John Deere 300X
John Deere 553
John Deere HX10
John Deere HX14
John Deere MX10
John Deere MX8
John Deere MX5
John Deere MX6
John Deere MX7
John Deere HX20
John Deere CX20
John Deere RC60L
John Deere RC72L
John Deere RC72
John Deere RC78
John Deere 1800
John Deere E-GATOR
John Deere DB84
John Deere DB96
John Deere 50ZTS
John Deere 27ZTS
John Deere 35ZTS
John Deere 17ZTS
John Deere 27CZTS
John Deere 35CZTS
John Deere 50CZTS
John Deere 27D
John Deere 17D
John Deere 60D
John Deere 35D
John Deere 50D
John Deere CH8
John Deere 540
John Deere 2000
John Deere MCS
John Deere 2 Bag Bagger
John Deere 5080R
John Deere 5090R
John Deere 5100R
John Deere 5100RN
John Deere 5080RN
John Deere 5090RN
John Deere 5070M
John Deere 5080M
John Deere 5090M
John Deere 5100M
John Deere 790
John Deere 670
John Deere 770
John Deere 4300
John Deere 4700
John Deere 4400
John Deere 1050
John Deere 4200
John Deere 4720
John Deere 2320
John Deere 4600
John Deere 970
John Deere 2520
John Deere 4010
John Deere 4320
John Deere 4520
John Deere 4710
John Deere 4500
John Deere 4100
John Deere 4110
John Deere 4115
John Deere 4210
John Deere 4310
John Deere 4410
John Deere 4510
John Deere 4610
John Deere 870
John Deere 1070
John Deere 990HC
John Deere 2210
John Deere 3120
John Deere 4120
John Deere 3320
John Deere 3520
John Deere 3720
John Deere 2305
John Deere 3203
John Deere 4105
John Deere 3005
John Deere 4005
John Deere 2720
John Deere 3032E
John Deere 3036E
JOHN DEERE diagnostic adapter for construction equipment, agriculture, engines John Deere.
What can I do with one CAT Caterpillar ET Diagnostic Tool
Retrieve engine totally for fuel used, miles traveled, and hours operated.Display status of all parameters, such as engine speed, throttle position, timing advance, fuel flow, etc.View active and logged diagnostic codes to identify faulty sensors.
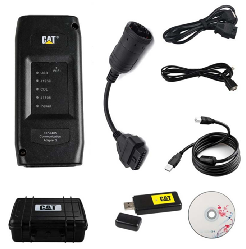
What can I do with one CAT Caterpillar ET Diagnostic Tool: CAT Communication Adapter III has to work with a computer, and we users can display the status of a group of parameters (temperatures, pressures, etc.) details: 1.Display Logged Event Codes to show engine over speeds, High temperatures, fuel consumption, etc;
2.View ECM’s current configuration and change user settings;
3.Perform diagnostic tests and calibrations, and calibrate;
4.Electro-mechanical and electro-hydraulic components;
5.Context sensitive help leads operator through every task diagnostic tools Cat ET can perform
6.Data Logger and Data Log Viewer allows recording of ECM signals for delayed troubleshooting capability.
Caterpillar ET is available with the language I want:
The most important reason why I choose Auto key Programmer CAT
Caterpillar ET Diagnostic Adapter III is that it is available with the
language what I want, the language it supports includes: Danish,
English, French, German, Italian, Japanese, Portuguese and Spanish
Support car list of CAT Caterpillar ET Diagnostic Tool :
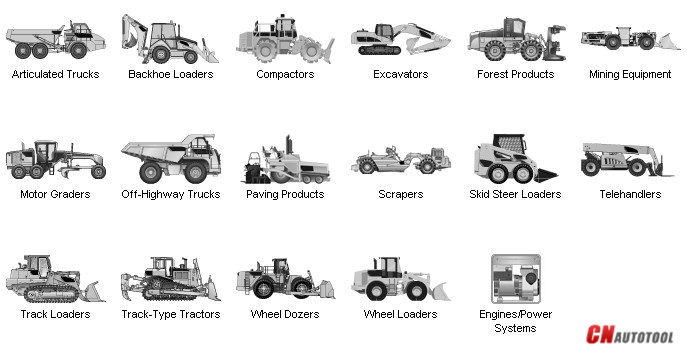
With the CAT Diagnostic Tool, you can:
View active and logged diagnostics
View events where irregularities occurred and were logged by the ECM
View the status of a group of parameters (temperatures, pressures, etc.) simultaneously
Record and log performance data
Graph a group of status parameters
View the current configuration of an ECM
Change ECM configurations
Perform diagnostic tests
Perform calibrations
Print reports and diagnostic results
For some machine and engine products, additional functionality has been included with the service tool program
Features
Display, graph and log status parameters.
Retrieve prognostic data including histograms, engine totals for fuel used and miles traveled.
View active diagnostics and clear logged diagnostics. View events where
irregularities have occurred and have been logged by the ECM.
Perform calibrations to enhance performance of the ECM.
Customize the ECM with application-specific settings.
Over 100 custom Diagnostic, Information and Service features including:
– 2D and 3D Histogram plotting capability (engine software
support required).
– Custom Status screen groups
– Snapshots (Download and display snapshot data recorded by the
ECM)
– Configuration Aid that allows upload/download of same
configuration to multiple control modules
Customised Service Tool Options
Customized service tool name
Customized graphics for the splash screen and icons
Customized installation
Aftermarket differentiation, i.e., the tool for one customer does not work on the product of another customer.
Licensing options for customer management
Flash programming of the ECM(s)
Training demonstration allows familiarity with the tool’s primary functions without connecting to ECM(s)
Perform customized diagnostic tests to identify harness problems,
cylinder or component failures (Automatic Cylinder Cutout with cylinder
to cylinder fueling comparison)
More Details please contact us:https://www.cnautotool.com/goods-2485-2017A+Version+CAT+Caterpillar+ET+Diagnostic+Adapter+III.html
Mercedes Vediamo Xentry Das Developer Mode User Manual
MB Star Diagnosis Xentry/das
developer mode with Mercedes Vediamo for SCN coding no need SCN
account. Few Customer inquiry Star Diagnosis Xentry/DAS developer mode
Mercedes Vediamo, How to use the Mercedes Vediamo software?
CnAutotool.com share the Mercedes Vediamo Star diagnosis developer mode user manual as following.
MB Star Diagnosis Xentry Das with Vediamo Xentry/DAS Developer Mode

XENTRY MERCEDES DIAGNOSTIC SOFTWARE 2017 2 MB Star Diagnosis Xentry/DAS Developer Vediamo Mode User Manual
Here is MB Star Diagnosis Xentry/DAS Developer Mode User Manual, incl three part:
What you need for Mercedes Vediamo Xentry/DAS Developer Mode ?
When & why you should use Mercedes Vediamo Xentry Developer Mode?
How to use Mercedes Vediamo Developer Mode step by step?
THE MOST IMPORTANT NOTE: you are trying on your own risk!!!!!!!!
Be very careful when using the Developer functions! Many of them can
cause irreversible damage to the components of the vehicle and may cause
personal injury! Please be aware that modification to some specific
systems (airbags, braking systems) may make the vehicle unsafe for on
road use and may violate the local highway laws, rendering the car not
roadworthy in the legal aspect.
This is especially true for the SRS modules, where unintentional usage
of developer options may cause deployment of airbags/tensioners and
other aggressive restraint systems.
IMPORTANT NOTE: what do you need for Xentry/DAS Developer Mode?
– original Mercedes diagnostic tools like Super mb star c3 or HQ clone like SDconnect C4 china clone mux
– DAS/XENTRY with good installation
– a laptop running with Windows XP better
IMPORTANT NOTE: why & when should you use Xentry/DAS Developer Mode?
As a presumed DAS user you have probably learned already that there are
number of functions that would logically belong to the software options,
but they
are missing from the regular DAS installations. These include recoding
(variant coding) the control units without SCNs (Software Calibration
Numbers), de/activation of commercially sensitive options (in-motion
video of tv/dvd), recoding the configuration of airbag units, seat belt
reminders, changing the configuration of instrument clusters, restoring
damaged EEPROM contents for Comand/APS and other ECUs and many more.
There is also an additional benefit: sometimes control units record a
DTCs (error codes) that are filtered out by the production software.
Developer kit allows unfiltered view on the module’s error memory,
therefore allowing to see all stored trouble codes, including the masked
ones.
The reasons for disabling these functions in the DAS setups seen at the
dealership are very simple: firstly, risk associated with using them is
too high to open these tools to (very often) under trained and rushing
technicians; secondly, there are several legal obligations that put
restrictions on what the dealer can do and what he can not – for
instance, recoding tv-in-motion, airbags and emission-re lated systems
fall into this category. Thirdly, electronically damaged components very
often result in replacement, therefore repairing (recoding) would have
adverse effect on spare parts revenue.
Here is how to : clean ASSYST Plus Memory
Firstly, you need the mentioned Developer key made according to your LAN
ID. Before scrapping your old key, take note of the LAN ID (there are
some cases when it changes ie. when reconfiguring the hardware) and the
current License Key in the DAS. Both information can be found in the
licensing menu of Star Utilities. Then replace your current key with
Developer key, save and restart DAS. After selection of vehicle class
there should be now a new screen (in German, except V-Series and W221
where it comes in English) informing you about dangers associated with
using Developer Kit. You are good to go now.
In Mercedes Vediamo Developer mode : (tested version 11-2010)
Steuergerate (Control units) ->F3
Aufbau (Body) ->F3
ZGW (CGW) ->F3
Entwicklungen (Development data) ->F3
Steuergerate – Anpassungen (Control unit adaption) ->F3
Programmieren (Update) von Steuergeraten (Control module programming) ->F3
Steuergerat programmieren (Auswahl) (Program control unit (Selection)) ->F3
Now we have 2 options to flash the ZGW/CGW with, choose the correct one
Don’t panic ! if you choose the wrong file , it terminates process and you can do it over again
Confirm Flash pop-up with Ja (Yes)
After that it says : “Das Steuergerate wurde erfolgreich programmiert”
->”OK” it ask for a reset -> JA (Yes) ->
ECU Reset (FN_ECU_Reset) ->F3 again ->F3
Now you Complete full History wipe
Enable Comand DVD/TV in Motion (W211 W219) and OTHERS
USE THIS TIP WITH CARE AND COMMON SENSE !!! AND OBEY LOCAL LAWS.
In obd2tool.com Vediamo Developer mode :
Audio, Video, Navigation und Telematik ->F3
a screen might pop up with all kind of settings, ignore and press F2
New screen with ESD warning ->F3 COMAND /AUDIO -AUDIO 50 oder COMAND ->F3
Entwicklungsdaten ->F3
Steuergerate-Anpassungen ->F3 Steuergerate-Anpassungen (Variantencoderierung) ->F3
HU Parameter ->F3 scroll down to line: Driving speed is more than 0 kph and
Driving speed is more than 10 kph and BOTH enable them and ->F3 to confirm coding
Now you be able to watch DVD/TV when car is in motion
Uprate the speed limited in a gasoline (ME-series controller) engine control unit
Log on to DAS, connect to the car, select:
Control Units -> Drive -> ME-SFI 28 -> Development Data.
Then select the Control Unit Adaptations -> Explizite Kodierung
This option works quite the same in Diesel engine models, however i
found it more difficult to use (quite frequently modules are replying
with an error message to the attempt of recoding). I was able to
successfully remove the speed limiter on a CDI2 series module from the
W210 model and some others as well.
Addrear airbags to the AB control module
Control Units -> Body -> Airbag (AB) -> Development Data ->
Control Module Adaptations -> Variant Coding -> Fahrzeugausstatung
Kodieren
(the last menu entry can be slightly d ifferent in various module variants)
Select the drop-down list in the field Airbag Hinten Rechts and Airbag
Hinten Links – set to YES. Back up to the main Airbag menu, reset the
fault codes, cycle ignition, reset fault codes again and cycle the
ignition for 2nd time (this step is very important).
Addfog lamps to function as a cornering aid
Select Body, then Driver Side SAM -> Development Data -> Control
Unit Adaptations -> Variant Coding -> Abbiegelicht set to ON
(“ja”).
Then go to the Passenger SAM (if present, for example in 211/219 model
series) and similarly, perform the same coding in the second SAM unit. I
have found that quite often cars manufactured prior to year 2003 have
the relevant cornering lights option available in the left sam, however
right sam is missing it. Not a big problem since these are readily and
cheaply available from the second-hand market.
For all the onboard systems to recognize the new function you will also
need to recode the CGW or EZS and mark the appropriate factory option in
the adaptations.
Hidden error codes
For W211/W219/W230 series with SBC system, go to the Chassis->
Sensotronic Brake Control (SBC) then enter Development Data then call up
Fault Codes. Most likely, a car that has been driven for some time will
have a code “Event: ABS Bremsung” stored. This Fault/Event is not
normally shown in the general menu of DAS – it is being filtered. It
actually
does not represent an actual error, just a specific condition (hard
braking with ABS activation). You will find many modules that actually
filter out some more or less useful fault codes.
This menu is also very useful when evaluating vague fault codes (ie:
“Hydraulics fault” in the general version in the developer menu can be
drilled down to something more meaningful like “rear left release valve
stuck in closed state” – this will come in German though).
Adapting the SRS control unit to a new car (different configuration, different VIN).
First of all erase all present error codes in the unit if possible. If
there are current faults the airbag module might not get properly
reinitialized.
Then proceed to the menu control unit adaptations -> special functions -> Control Unit is released.
From this point do not turn the ignition off or reset the control
module. Proceed to the menu option “initial startup” where the current
configuration will be reinitialized and new VIN can be written to the
control unit.
Please pay attention to the specified configuration (ie. Does the car
have rear side airbags?) otherwise you will end up with a controller
that does not recognize airbags installed in the vehicle.
After completing the initial startup, reset the control module (cycle
ignition) and erase all fault codes resulting from the startup process.
Extend SBC life
UNDER NO CIRCUMSTANCES USE THIS PROCEDURE MORE THAN ONCE ON ANY CAR AS
TRUE SERVICE LIFE OF SBC UNIT IS AROUND 160-180% OF WHAT MB SET THE UNIT
AT
Make sure engine is running !!!
In Mercedes Vediamo Developer mode from obd2tool.com you need to go to
Entwickelingsdaten – > ansteueringen -> Gesamstliste aller
Ansteuerungen
to see how many times brake has been pressed there is a line that says: Bremsenzahler (DJ_GetBrLive)
then 1 line down there you see Bremsenzahler aktualisieren und Lebensdauerzahler F neu berechenen -> click it !
Parameter uINBR = 0
then click F3
1 line down Bremsenzahler auf beliebigen Wert setzen (DJ_SetNBr) -> click it
Parameter uINBR = 0
then click F3
then scroll down untill you see the line’s :
Lebensdauerzahler F neu berechenen (DJ_CalcLiveTime)
Parameter uINBR = 0
then click F3
Lebensdauerzahler F neu berechenen und schreiben (DJ_BuildAndWriteF)
Parameter uINBR = 0
then click F3
Log out of SBC !!
log out of verhicle !!
let engine run at least 10 minutes or drive at least 10 minutes
If no coils are damaged , SBC fault code is not AKTUEL no more
Desactivate seat children and ocuppancy seat in mercedes ml270 cdi
MUST READ !!
Warning !! Warning !!
After completing this procedure
NEVER use a child seat in this seat again
Warning !! Warning !!
EXTREME CAUTION TO BE USED WITH THIS METHOD
In obd2tool.com Mercedes Vediamo Developer mode , you have to Disable AKZE in passenger seat.
When you disable this feature, passenger airbag in Dashboard, will work
ALLWAYS when crash signal come’s from the front of the car , even if no
passenger is sitting in this chair . So in an accident from the front,
you allways have to buy a new Dashboard + dash airbag as well
Important !!
After you disabled AKZE in SRS unit ,you will notice you can’t erase the fault , or another fault came back (fault coding).
To complete procedure , you have to unplug the Yellow AKZE connector
under passenger seat, so SRS can’t measure anything connected on this
input port.
Now you can erase Fault codes in SRS , and your SRS light in Instrumentcluster will go off
MUST READ !!
Warning !! Warning !!
After completing this procedure
NEVER use a child seat in this seat again
Warning !! Warning !!
Activate this secret function as litres, datum, bigger pictures/symbols of some check controls on all models
like W211


AGAIN! DISCLAIMER: The author takes no responsibility for any damage
caused by use of the Developer Kit of DAS. This option is a very
powerful tool but must be used responsibly and with extreme caution. If
in doubt, please do not blindly try the menu options – several of them
will cause EEPROM or FLASH memory damage, requiring the module to be
disassembled and reprogrammed using external tools – this is a
troublesome and risky operation. Unintentional actuation of components
may cause mechanical failures or even risk of fire – please remember,
that in obd2tool.com Mercedes Vediamo Developer Mode DAS will do exactly
what you command, all safety checks and interlocks are bypassed!
More question about Mb Star C4 Diagnostic software Xentry DAS Diagnostic Mercedes Vediamo software pls feel free to let me know.
John Deere Service Advisor EDL heavy duty diagnostic adapter
Multi-language available: English, French, Italian, Spanish, Portuguese
Note: HDD comes in English in default. If you need other language, please contact our customer service before ordering.
John Deere Service Advisor EDL (Electronic Data Link) heavy duty diagnostic adapter for construction equipment, agriculture, engines John Deere.
John Deere Diagnostic kit includes software John Deere Service Advisor Agriculture or Construction and Forestry version.
We have two version software V4.0 and V4.2 for john deere service advisor edl v2:
1.V4.0 software: Support Languages: English
2.V4.2 software:Support Languages: English, French, Italian, Spanish, Portuguese
Notice: If you want to do 3038E truck, then need to use V4.2 software (Hardisk Version).
With John Deere Service Advisor PLD File Encryptor/Decryptor you can:
-Decrypt PayLoad (PLD) file to txt/ini format
-Modify PLD file expiration
-Modify PLD factory options such as speed limit (for example change 40 km/h to 50 km/h)
-Adjust PLD file to different product serial
-Encrypt PLD file
-Program controller with modified PLD using Service Advisor
-Support Windows XP
How to change speed limit with pld files?
Q1:
Question about payload files:
I have pld files of my tractor (6330P) 11 in total.
I see in bottom of each files info about my tractor (option, serial number etc)
Question: My goal is up the speed limit from 40km to 50 km. I think I have to change OPTION=3 to OPTION=5, but do I have to edit each 11 pld file?
A1:
You were right about the speed limit:
you can change OPTION=3 to OPTION=4 or any other you need.
Speed_30kmh = 1;
Speed_35kmh = 2;
Speed_40kmh = 3;
Speed_50kmh = 4;
Speed_ECO = 5;
Speed_NoiseRed_OOS = 6;
For R models the line is different. ROADSPEEDLIMIT=3 change to ROADSPEEDLIMIT=5 or any other you need.
var RoadSpeedLimit_30 = “1”;
var RoadSpeedLimit_35 = “2”;
var RoadSpeedLimit_3840 = “3”;
var RoadSpeedLimit_40E = “4”;
var RoadSpeedLimit_50 = “5”;
var RoadSpeedLimit_50E = “6”;
var RoadSpeedLimit_55 = “7”;
var RoadSpeedLimit_60 = “8”;
var RoadSpeedLimit_60E = “9”;
After you change it, sometimes you still need to lift the speed manually through the display (depending on the tractor model)
You only need to reprogram transmission controller for that.
If you reprogrammed all of them, some settings might have went to default so you might get up to 5 fault codes that you need to configure with SA.
Q2:
Does it work with SA 4.2?
A2:
Service Advisor is just a tool to use pld. Pld editor works without SA.
Q3:
I have a question about trying to up the power of a 6330 to a 6430. If I compare the engine pld of both tractor they are identical (just the info in the bottom is different) So I don’t know how it could up the power if all the code is the same??
A3:
most pld files are made for various models, the info at the bottom determines which part of the pld file will be used for programming. For example:
PRODUCT_MODEL_NO=6115
PERFORMANCE_OPTION_PART_NO=R546973
FACTORY_OPTIONS=RE570443
If you want to know model list,please check the link:https://www.cnautotool.com/goods-6996-V52-John-Deere-Service-Advisor-EDL-V2-Electronic-Data-Link-Truck-Diagnostic-Lenovo-T410-Laptop.html
Comparison table of Xtool X100 PAD3 & X100 PAD2 Pro
Xtool X100 PAD3 ( X100 PAD Elite ) is a professional tablet key programmer for all makes, also it supplies advanced special service functions, OBD2 diagnostic functions and mileage adjustment functions. It is the latest Xtool Tablet Key programmer, Upgrade version of X100 Pad/PAD2.
Comparison table of Xtool X100 PAD3 & X100 PAD2 Pro:
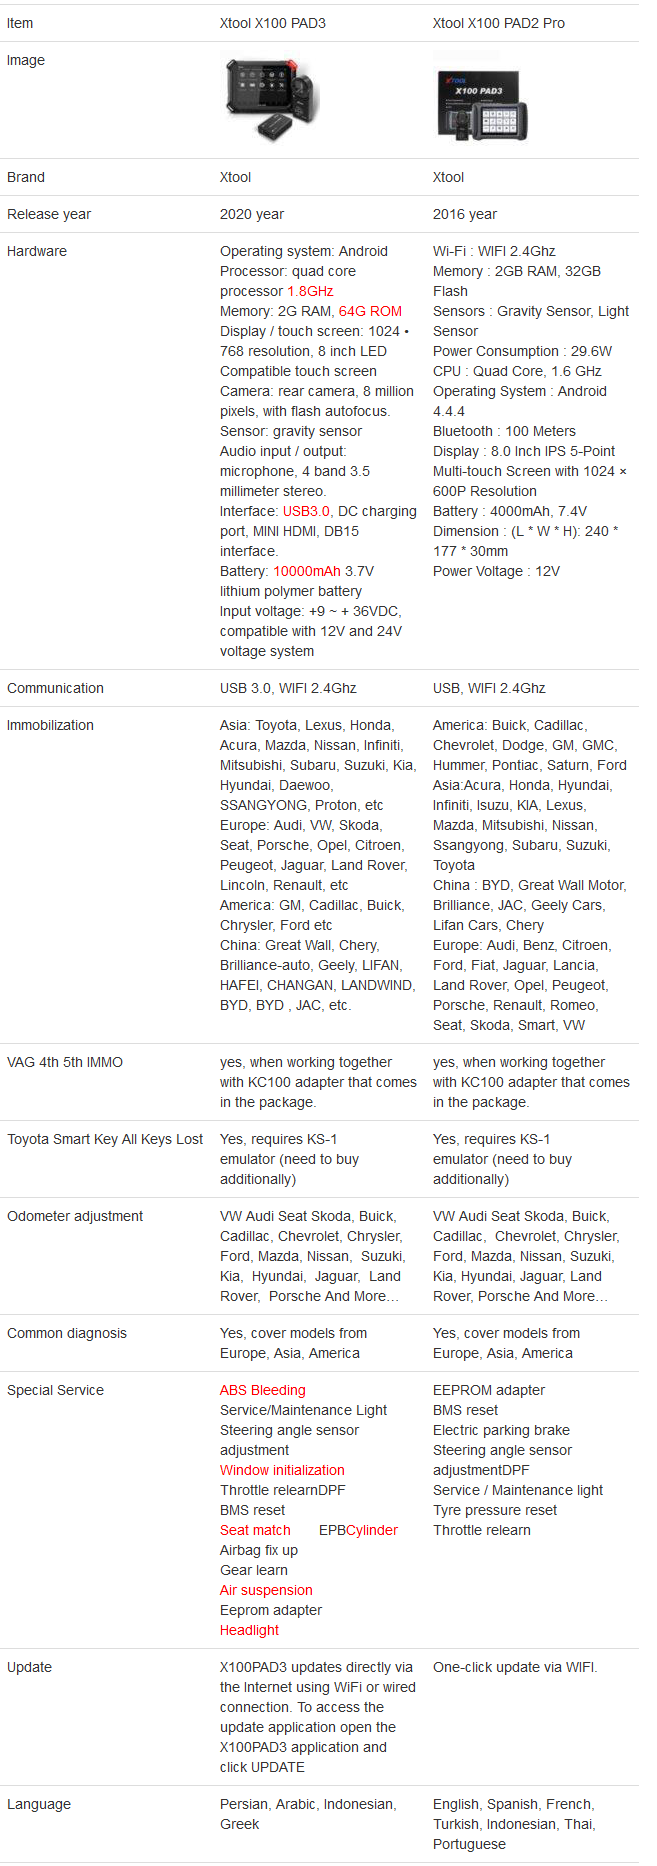
Xtool X100 PAD3 tablet key programmer is much better than X100 PAD2 Pro in the aspects of hardware parameters, special functions, car models.
Xtool X100 PAD2 Pro also allows the user to authorize the local car makes, but the software version is 1-year older than that from the local dealer, and the service is free.
Xtool X100 PAD3 Pros:
-All aluminum alloy & silicone: Covered with all aluminum alloy and silicone, X100 PAD Elite has more crash-resistant and durable hardware.
-Android Operating System: The Android-based touch screen tablet features powerful Quad core processor.
– Multi-color UI
X100 PAD3 features simple & elegant appearance design, excellent workmanship and multi-color UI, high-definition display is clearly visible even in direct sunlight.