cnautotool offical blog
the blog of www.cnautotool.comcnautotool offical blog
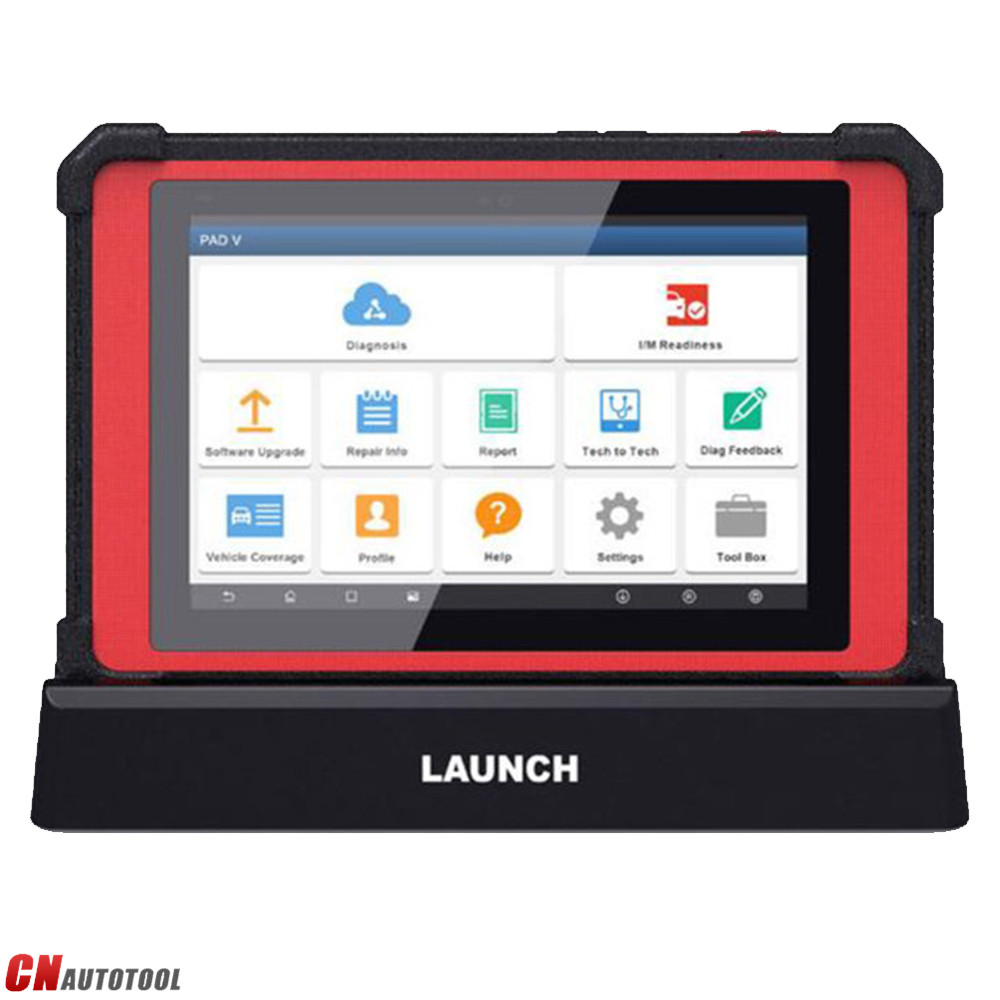
the blog of www.cnautotool.comHow to use the diagnostics function of Launch X431 PAD V
How to use the diagnostics function of X-431 PAD V
1. Intelligent Diagnosis
Through simple Wi-Fi communication between the tablet and VCI, you can
easily get the VIN (Vehicle Identification Number) information of the
currently identified vehicle. Once the VIN is successfully identified,
the system will retrieve it from the remote server and then guide you to
vehicle information page without the necessity of step-by-step manual
menu selection.
The vehicle information page lists all historical diagnostic records of
the vehicle, which lets the technician have a total command of the
vehicle faults. In addition, a quick dial to local diagnosis and
diagnostic function are also available on this page for reducing the
roundabout time and increasing productivity
*Notes:
•Before using this function, please make sure the VCI is properly
connected to the vehicle’s DLC. For detailed connection, see Chapter
5.1.3 “Vehicle Connection”.
•A stable network connection is required for this function.
Follow the steps below to proceed.
1.Tap “Intelligent Diagnose” on the Job Menu to enter Fig. 1.

2.After pairing is complete, the handset starts reading the vehicle VIN.
A.If the VIN can be found from the remote server database, a screen similar to the following figure displays:

•Tap “Diagnostic” to start a new diagnostic session.
•Tap “Scan History” to view its historical repair record. If there are
records available, it will be listed on the screen in sequence of date.
If no records exist, the screen will show “No Record”.

•Tap “View record” to view the details of the current diagnostic report.
•To perform other functions, tap “Quick access” to directly go to the
function selection screen. Choose the desired one to start a new
diagnostic session.

In this mode, you need to input the VIN manually or tap to scan it.
1)Tap to launch the VIN recognition module.

Place the VIN inside the viewfinder rectangle to scan it. The most
recognizable location for this number is in the top left corner on the
vehicle’s dashboard. Other locations include the driver’s door or post,
and the firewall under the hood.
•To switch the display orientation, tap ![]() .
.
•To turn the flash on, tap ![]() .
.
•If you have scanned the VIN of the vehicle, tap ![]() to choose it from the record list.
to choose it from the record list.
•In case the handset failed to detect it, tap ![]() to enter it manually.
to enter it manually.
•Tap ![]() to switch the camera to barcode pattern recognition mode.
to switch the camera to barcode pattern recognition mode.
•![]() indicates the camera is in character pattern recognition mode (default mode).
indicates the camera is in character pattern recognition mode (default mode).
After scanning, the screen automatically displays the result.

2. Local Diagnosis
Tap “Local Diagnose” to enter the vehicle selection page.
2 approaches are provided for you to access the vehicle diagnostic software. Choose any one of the following ways:
1.VINSCAN
This function enables you to access it more quickly.
In this case, automatic scan (OBD VIN) and manual input (INPUT VIN) are available.
Tap “VINScan”, the screen displays as follows:

A.Camera Scan: In this mode, the VCI device should be plugged into the vehicle’s DLC.
Tap “Camera Scan”, a screen similar to the following appears:

Place the VIN inside the viewfinder rectangle to scan it. The most recognizable location for this number is in the top left corner on the vehicle’s dashboard. Other locations include the driver’s door or post, and the firewall under the hood.
•To switch the display orientation, tap .
•To turn the flash on, tap .
•If you have scanned the VIN of the vehicle, tap to choose it from the record list.
•In case the handset failed to detect it, tap to enter it manually.
•Tap to switch the camera to barcode pattern recognition mode.
• indicates the camera is in character pattern recognition mode (default mode).
Once the test vehicle is successfully identified, the tablet will jump to the function selection page directly.
Tap the desired option to perform the corresponding function.
•To switch the display orientation, tap ![]() .
.
•To turn the flash on, tap ![]() .
.
•If you have scanned the VIN of the vehicle, tap ![]() to choose it from the record list.
to choose it from the record list.
•In case the handset failed to detect it, tap ![]() to enter it manually.
to enter it manually.
•Tap ![]() to switch the camera to barcode pattern recognition mode.
to switch the camera to barcode pattern recognition mode.
•![]() indicates the camera is in character pattern recognition mode (default mode).
indicates the camera is in character pattern recognition mode (default mode).
After scanning, the screen automatically displays the result.
Once the test vehicle is successfully identified, the tablet will jump to the function selection page directly.
Tap the desired option to perform the corresponding function.
B.INPUT VIN: In this mode, you need to input the VIN manually. In general, vehicle identification numbers are standardized – all contain 17 characters. VIN characters may be capital letters A through Z and numbers 1 through 0; however, the letters I, O and Q are never used in order to avoid mistakes of misreading. No signs or spaces are allowed in the VIN.
Tap “INPUT VIN” and a screen similar to Fig. 15 will appear:

Input the VIN, and tap “Confirm”, the system will automatically
identify the vehicle model and directly navigate to the function
selection page.
2.Manual Selection
Tap a corresponding diagnostic software logo, and then follow the on- screen instruction to access the diagnostic software.
Take Demo as an example to demonstrate how to diagnose a vehicle. 1).
Select diagnostic software version: Tap the “DEMO” to go to Step
2. (*Note: If more than one version is available on this tablet, it will be
listed on the screen.)

On-screen Buttons:
Vehicle Coverage: Tap to view the vehicle models that the current diagnostic software covers.
What’s new: Tap to view the optimized items and enhancements. Introduction: Tap to check the software function list.
Note: Tap to read some precautions on using the current diagnostic software.
OK: Tap it to go to next step.
2). Select test item: Select the desired test item to proceed.

3. Health Report (Quick Test)
This function varies from vehicle to vehicle. It enables you to quickly
access all the electronic control units of the vehicle and generate a
detailed report about vehicle health.
Tap “Health Report”, the system starts scanning the ECUs. Once the
scanning is complete, a screen similar to the following appears:

In Fig. 18, the tested system with fault code appears in red and the system with OK displays in white (normally).
*Note: Diagnostic Trouble Codes or Fault Codes can be used to identify which engine systems or components that are malfunctioning. Never replace a part based only on the DTC definition. Retrieving and using DTCs for troubleshooting vehicle operation is only one part of an overall diagnostic strategy. Follow testing procedures (in vehicle’s service manual), instructions and flowcharts to confirm the locations of the problem.
On-screen Buttons:
: Tap to display the details of DTCs existing in the current system. Tap to hide it.
Highlight certain DTC item, and tap to open the browser to retrieve it in Google engine.

Enter: Tap to select other test functions.

Report: Tap to save the diagnostic result as a report.

*Note: Diagnostic report is classified into three categories: Pre-Repair report, Post-Repair report and Diagnostic Scan. No matter which type you saved the report as, the report type will be appended as a tag on the upper right corner of the diagnostic report for easier identification.

Tap to select the report type from the option list and input the required information, and then tap “OK”.
*Note: To facilitate the comparison of the pre-repair and post-repair
reports and get accurate test result, please make sure you saved the
right type of the diagnostic report.
To save the report as a common diagnostic report, select “Diagnostic Scan”.
Enter the technician and customer name and then tap “OK” to confirm and navigate to the report details page.

*Note: For workshop information, tap “Change” to revise it.
Alternatively you can also set it in “User Info” -> “Settings” ->
“Print Information”.
Once you configured the information, it will be automatically generated
every time you saved the diagnostic report. All vehicle and workshop
information will be appended as tags on the diagnostic report.
To ignore the workshop information, tap “Skip” to go to the report details page.
On the report details page, tap “Save” to save it. All diagnostic
reports can be accessed from “User Info” -> “My Reports” ->
“Health Report”.
Help: Tap to view the help information of the selected DTC item.
Compare Results: Tap to select the pre-repair report to compare. By
comparison of the pre- and post- repair reports, you can easily identify
which DTCs are cleared and which remain unfixed.

*Note: Before performing this function, please make sure that:
•You have saved a pre-repair report of the currently tested vehicle, and
•You have already made some repairs and service and cleared the DTCs
after the pre-repair reported is generated. Otherwise, no differences
exist between the pre- and post- repair reports.
Clear DTC: Tap to clear the existing diagnostic trouble codes.
*Note: Clearing DTCs does not fix the problem(s) that caused the code(s) to be set. If proper repairs to correct the problem that caused the code(s) to be set are not made, the code(s) will appear again and the check engine light will illuminate as soon as the problem that cause the DTC to set manifests itself.
System Scan
This option allows you to quickly scan which systems are installed on the vehicle.
In Fig. 17, tap “System Scan”, the system starts scanning the systems.
Once the scanning is complete, the screen will display the result.

Tap the desired system to advance to the test function selection page. For detailed operations on test function, please refer to Chapter 5.3.2.3.
System Selection
This option allows you manually select the test system and function step by step.
In Fig. 17, tap “System Selection”, the screen displays as follows:

Swipe the screen from the bottom to view the vehicle system on the next page.
Tap the desired system (take “ECM” for example) to jump to the test function page.

*Note: Different vehicle has different diagnostic menus.
A.Version Information
This function is used to read the version information of system mode, vehicle VIN, software and ECU.
In Fig. 27, tap “Version Information”, the screen displays as follows:

Tap “OK” to confirm and exit.
B.Read Fault Code
This function displays the detailed information of DTC records retrieved from the vehicle’s control system.
In Fig. 27, tap “Read Fault Code”, the screen will display the diagnostic result.

*Note: Retrieving and using DTCs for troubleshooting vehicle operation is only one part of an overall diagnostic strategy. Never replace a part based only on the DTC definition. Each DTC has a set of testing procedures, instructions and flow charts that must be followed to confirm the location of the problem. This information can be found in the vehicle’s service manual.
On-screen Buttons:
Freeze Frame: When an emission-related fault occurs, certain vehicle
conditions are recorded by the on-board computer. This information is
referred to as freeze frame data. Freeze frame data includes a snapshot
of critical parameter values at the time the DTC is set.
Help: Tap to view the help information.
Code Search: Tap it to search for more information about the current DTC online.
Report: To save the current data in text format. All diagnostic reports
can be accessed from “User Info” -> “My Reports” -> “Diagnostic
Report”.
C.Clear Fault Code
After reading the retrieved codes from the vehicle and certain repairs
have been carried out, you can use this function to erase the codes from
the vehicle. Before performing this function, please be sure the
vehicle’s ignition key is in the ON position with the engine off.
Clearing DTCs does not fix the problem(s) that caused the code(s) to be
set. If proper repairs to correct the problem that caused the code(s) to
be set are not made, the code(s) will appear again and the check engine
light will illuminate as soon as the problem that cause the DTC to set
manifests itself.
In Fig. 5-25, tap “Clear Fault Code”, a confirmation dialog box pops up
on the screen. Tap “Yes” and the system will automatically delete the
currently existing trouble code.
*Note: After clearing, you should retrieve trouble codes once more or turn ignition on and retrieve codes again. If there are still some trouble codes in the system, please troubleshoot the code using a factory diagnosis guide, then clear the code and recheck.
D.Read Data Stream
This option lets you view and capture (record) real-time Live Data. This
data including current operating status for parameters and/or sensor
information can provide insight on overall vehicle performance. It can
also be used to guide vehicle repair.
*Note: If you must drive the vehicle in order to perform a troubleshooting procedure, always have a second person help you. Trying to drive and operate the diagnostic tool at the same time is dangerous, and could cause a serious traffic accident.
In Fig. 27, tap “Read Data Stream”, the system will display data stream items.

On-screen Buttons:
Select All: Tap it to select all items of the current page. To select
certain data stream item, just check the box before the item name.
Unselect: Tap it to deselect all data stream items. OK: Tap it to confirm and jump to the next step.
After selecting the desired items, tap “OK” to enter the data stream reading page.

*Notes:
1.If the value of the data stream item is out of the range of the
standard (reference) value, the whole line will display in red. If it
complies with the reference value, it displays in blue (normal mode).
2.The indicator 1/X shown on the bottom of the screen stands for the
current page/total page number. Swipe the screen from the right/left to
advance/return to the next/previous page.
•Value – this is the default mode which displays the parameters in texts and shows in list format.
•Graph – displays the parameters in waveform graphs.
•Combine – this option is mostly used in graph merge status for data
comparison. In this case, different items are marked in different
colors.
On-screen Buttons:
: Tap it to view the waveform graph of the current data stream item.

*Note: The real time (Live Data) vehicle operating information (values/status) that the on-board computer supplies to the tool for each sensor, actuator, switch, etc. is called Parameter Identification Data (PID).
Graph: Tap it to view the waveform.

•Combine: This option is mostly used in graph merge status for data comparison.

•Value: Tap to display the parameters in texts.
•Customize: Tap , a pull-down list of the data stream items appears on
the screen. Select (Maximum 8 data stream items can be
selected)/deselect the desired items and then screen will display/remove
the waveforms corresponding to these items immediately.

Select Sample DS: Tap it to select the sample DS file, the values you customized and saved in process of DS sampling will be imported into the “Standard Range”(See below) column for your comparison.
*Note: Before executing this function, you have to sample the values of data stream items and save it as an sample DS file.

Report: To save the current data as a diagnostic report. All
diagnostic reports can be accessed from “User Info” -> “My Reports”
-> “Health Report”.
Record: Tap to start recording diagnostic data. Recorded live data can
serve as valuable information to help you in troubleshooting of vehicle
problems. All diagnostic records can be replayed from “User Info” ->
“My Reports” -> “Recorded Data”.
*Note: The saved file follows the naming rule: It begins with vehicle type, and then the product S/N and ends with record starting time (To differentiate between files, please configure the accurate system time).
Help: Tap to view the help information.
Sample DS: This item enables you to customize the standard range of live
data stream items and save it as DS sample file. Each time you run the
data stream items, you can call out the corresponding sample data to
overwrite the current standard range.
Tap it to start recording the sample data (*Only data stream items with
measurement units will be recorded), and the screen displays as below:

Once recording is complete, tap to stop it and navigate to the data revision screen.

Tap the Min./Max. value to change it. After modifying all desired
items, tap “Save” to save it as a sample DS file. All DS files are
stored under the “Data Stream Sample” file in “User Info.”.
E.Actuation Test
This option is used to access vehicle-specific subsystem and component
tests. Available test vary by vehicle manufacturer, year, and model.
During the actuation test, the tablet outputs commands to the ECU in
order to drive the actuators, and then determines the integrity of the
system or parts by reading the ECU data, or by monitoring the operation
of the actuators, such as switching a injector between two operating
states.
In Fig. 27, tap “Actuation Test”, the system will display as follows:

Simply follow the on-screen instructions and make appropriate selections to complete the test. Each time when an operation is successfully executed, “Completed” displays.
http://obd2scantool.info/2021/01/29/how-to-use-the-diagnostics-function-of-x-431-pad-v/
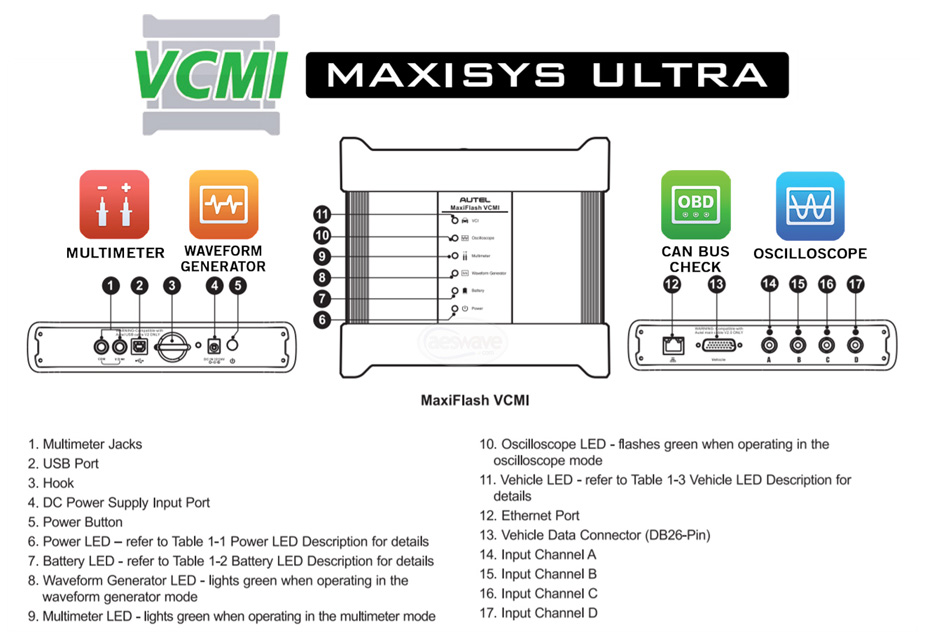
MaxiSYS Ultra Diagnostic Tablet Features and Benefits
MaxiSys Ultra Descriptions :
1. Autel updates provide latest OE level coverage for more than 80 US Domestic, Asian and European vehicles, including supercar
2. Exceptional OE-Level functionality from comprehensive OBDII diagnostics & services to advanced ECU coding and programming
3. Automatic system and software updates with real-time push message notifications via internet
4. Interactive Data Logging sessions enable direct contact with Autel
Support for first-hand troubleshooting of diagnostic bugs and errors
5. One-stop multitasking designed for ideal management of workshop
operations to keep all data files, customer info, and vehicle records
well organized
6. Cloud-based Data Manager saves customer and vehicle records, scanner data and technician notes
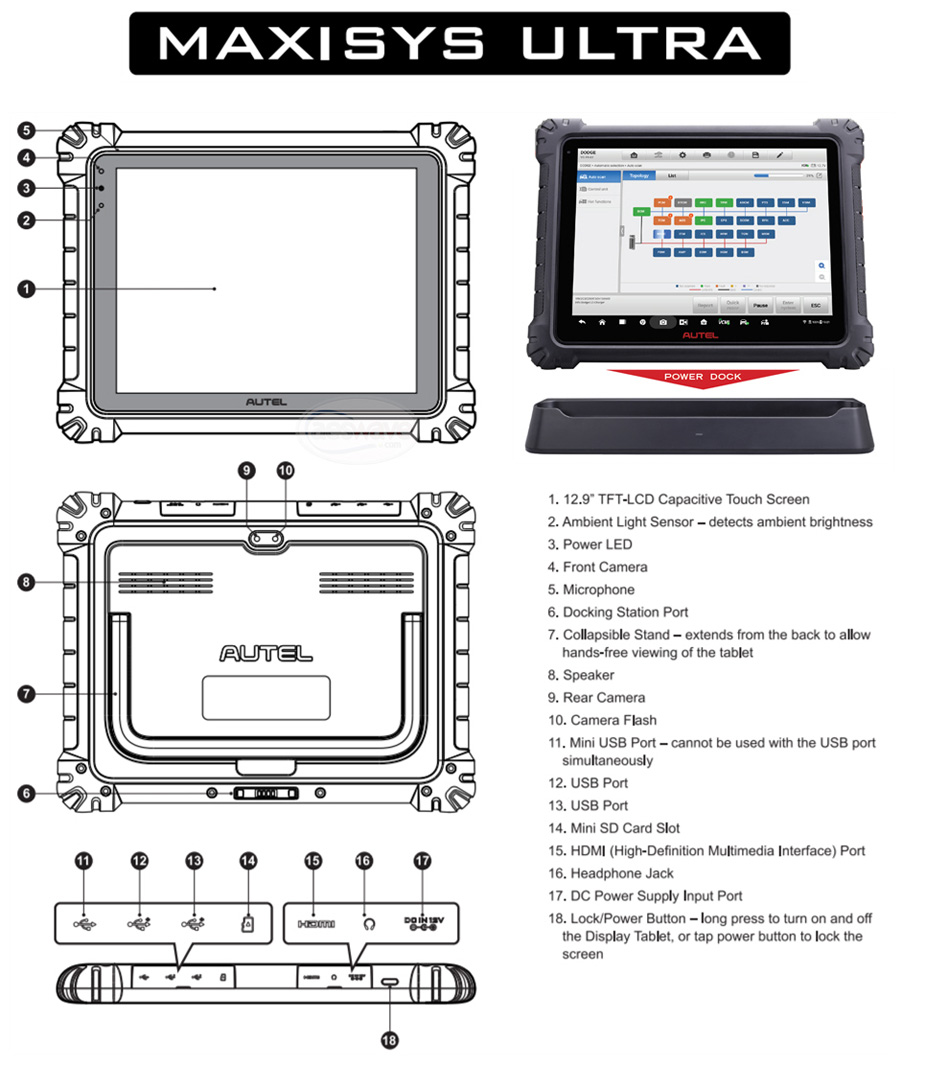
Features and Benefits:
Large 12.9’’ Touchscreen / Android 7.0 / Octa-core Processor
Advanced VCMI 5-In-1 Device with Oscilloscope / New VCI Protocols
Split Screen Multi-Application Function / Dual Wi-Fi Connection
Topology Mapping (supported vehicles) / Relevant Cases / Repair Assist and more
Includes Docking Station, Cables, Scope Connectors, Carrying Case, 1YR Warranty & Software Subscription
The MaxiSYS Ultra is Autel’s most ambitious diagnostics tablet to
date, featuring a 12.9-inch touchscreen Android-based tablet powered by
an Octa-core processor (2.3GHz Quad + 1.7GHz Quad), substantial 256GB
built-in memory and features the MaxiFlash VCMI, a 5-in-1 communication
and testing tool providing wireless vehicle communications between the
vehicle and tablet and supporting the latest DoIP, D-PDU and Mega CAN
vehicle communication protocols. The VCMI also functions as a 4-channel
oscilloscope, waveform generator, multimeter and CanBUS tester.
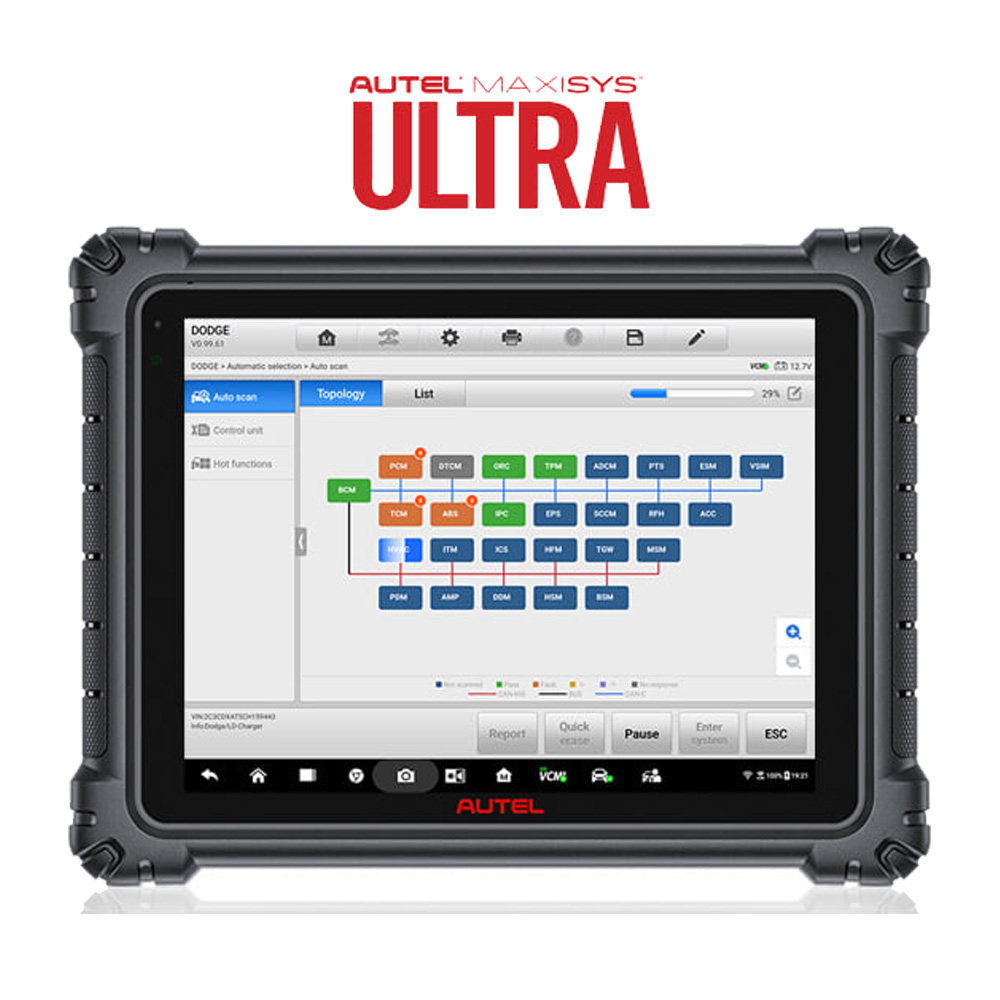
The Autel Maxisys Ultra
offers the most advanced approach to vehicle diagnostics with its
dynamic topology module mapping for supported vehicles combined with its
Intelligent Diagnostics feature that guides the technician from code to
repair to test with detailed repair information and illustrations, and
Oscilloscope preset guides and tests and waveform library. The Ultra
features a rechargeable Lithium battery proving 8 hours of continues
use, a convenient docking station and front and rear cameras.
Launch X431 Pad V 5 Function List: Passenger Cars & Heavy Duty Trucks Works
As you can see, Launch x431 pad5 is confirmed to work with passenger cars and heavy duty trucks.
Diagnostic for passenger cars: yes
Australian: AUST Holden, AUST Ford
Asian: Toyota/Lexus, Honda/Acura, Mazda, Subaru, Nissan/Infiniti, Mitsubishi, Hyundai, Isuzu, Daihatsu, KIA, Daewoo, Suzuki, Proton, Tata, Mahindra, Ssangyong, Perodua, Maruti
European: Audi, Mercedes/Maybach, BMW/MINI/Rolls Royce, VW/Bentley/Bugatti, Opel/Vauxhall, Peugeot, Citroen, Volvo, Sprinter, Renault/Dacia, Fiat/Romeo/Abarth/Lancia, Rover, Landrover, Saab, Seat, Skoda, Smart, Maserati, Ferrari, Arston Martin, Porsche, Jaguar
USA: USA Ford/Lincoln, GM/Buick/Cadillac/Chevrolet, Chrysler/Dodge/Jeep
Chinese: Changcheng(Great Wall), Geely, Qirui_TY(Cherry), Futian, Changan, Changhe, Haifei ….etc.
16 Special functions: Immobilizer/Key, Injector, Reset Brake Bleed, Reset TPMS, Electronic Throttle Relearn, Reset DPF, Reset SAS, Reset Oil, Reset Brake, Reset BMS, steering angle reset, gear learning, sunroof initialization, headlamp matching, suspension matching and AT matching, EGR Adaption.
Others: EOBD, Demo
Diagnostic for heavy duty trucks: yes
1) Software Coverage:
-Nissan (Diesel)
-Mitsubishi (Diesel)
-USA Ford Diesel, Kenworth
-Astra, Benz Heavy Duty, Bosch Diesel, China Heavy Duty, Cummins Heavy Duty, DAF, Delphi Diesel
-Denso Diesel, FAW Liberation, Foton Auman, FUSO, Hino, Hyundai Heavy Duty, Isuzu Heavy Duty
-Iveco Heavy Duty, JAC Heavy Duty, Mack , MAN , OBD Heavy Duty, Scania, Shangchai Diesel, Volvo Heavy Duty
-WP Diesel, Airbus, Allison Transmission Box, Ashok Rejlander, Bendix ABS, Caterpillar Heavy Duty
-Chai Heavy Vehicle, Chaoyang Diesel, Construction Machinery, CREDO Heavy Vechicle, Detroit Engine
-Dongfeng Commercial Vehicle, Dongfeng Yufeng, Doosan Engine, Freightliner Heavy Duty Truck
-Full Diesel Diagnosis Software, Haldex ABS Heavy Duty, HD_ABS System, HD_GoldenDragon,
-HD_International
-HD_Kinglong, HD_Maxxforce, HD_Tata, HD_Western_Star, Heavy Truck Presentation Software
-IRISBUS HD, IRIZAR HD, NEOPLAN HD, Peter HD, Renault HD, SETRA HD, Stannic Bavin, Sterling HD
-Sunlong Bus, Sunwin Bus, UD Trucks 2F Nissan Diesel, WABCO ABS, Yang Chai Engine
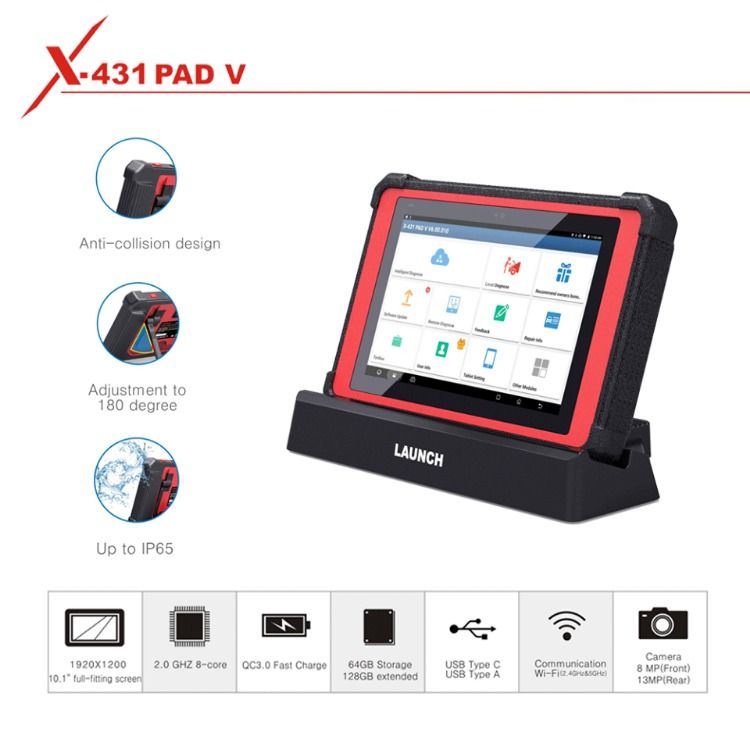
Launch X431 PAD V Features:
1. Full vehicle system coverage for over 110 brands in the world, which is continually updated
2. Full-function scan tool for both cars and trucks
3. Support J2534, DolP, CAN FD and other protocols with SmartBox 3.0 connector
4. Automatically identify VIN upon connection to the vehicle for intelligent diagnosis
5. Remote diagnosis allowing you to work on a vehicle from your tool without being on-site
6. Read all OTC types for full system, view, graph and record data PIDs,
support bi-directional controls, actuation test and all other
diagnostic functions
7. Guided function for Volkswagen and Audi
8. Advanced coding and programming function
9. 16 special functions available
10. ADAS calibration function is optional
11. Compatible with 5 extended module: Oscilloscope, sensor, battery test, endoscope, WiFi printer
12. One-Click Upgrade and silent install for software
13. Diagnostic records and reports can be stored in the cloud without any concern of data missing
14. Integrated database with comprehensive vehicle service and repair information
15. The latest 2.4 & 5GHz Dual Wi-Fi with high transfer speed, strong anti-interference and long-distant diagnosis ability
16. IP65 case with exceptional damage resistance to the water and dust for workshop use
17. Docking & charging station included with QC3.0 Quick Charge technology
18. Support USB Type C & Type A
X-431 PAD V is a high-end comprehensive diagnostic tool.For more information please visit our website sale@cnautotool.com
What are the Features of Launch X431 PAD?
X-431 PAD V is a high-end comprehensive diagnostic tool with charging base newly developed on the basis of Android 7.1. It supports dual 2.4GHz & 5GHz Wi-Fi communications, with features such as wide vehicle model coverage, powerful diagnostic functions, and accurate test data. Its IP65 case has exceptional damages resistance for water and dust, which will make workshop work easier and more comfortable. All these unique features will offer you a luxury experience of vehicle diagnosis.
Launch X431 Launch X431 PAD V Features:
1. Full vehicle system coverage for over 110 brands in the world, which is continually updated
2. Full-function scan tool for both cars and trucks
3. Support J2534, DolP, CAN FD and other protocols with SmartBox 3.0 connector
4. Automatically identify VIN upon connection to the vehicle for intelligent diagnosis
5. Remote diagnosis allowing you to work on a vehicle from your tool without being on-site
6.
Read all OTC types for full system, view, graph and record data PIDs,
support bi-directional controls, actuation test and all other diagnostic
functions
7. Guided function for Volkswagen and Audi
8. Advanced coding and programming function
9. 16 special functions available
10. ADAS calibration function is optional
11. Compatible with 5 extended module: Oscilloscope, sensor, battery test, endoscope, WiFi printer
12. One-Click Upgrade and silent install for software
13. Diagnostic records and reports can be stored in the cloud without any concern of data missing
14. Integrated database with comprehensive vehicle service and repair information
15. The latest 2.4 & 5GHz Dual Wi-Fi with high transfer speed, strong anti-interference and long-distant diagnosis ability
16. IP65 case with exceptional damage resistance to the water and dust for workshop use
17. Docking & charging station included with QC3.0 Quick Charge technology
18. Support USB Type C & Type A


https://www.cnautotool.com/category-35-b0-Launch+X431.html
Volvo Vocom 88890300 truck diagnostic tool is the latest diagnostic tool
Volvo Vocom 88890300 truck diagnostic tool is the latest, genuine and only OEM diagnostic tool made by Movimento in Sweden and designed for maintenance of Volvo, MACK, Penta (Marine engines), UD, Renault EURO 6 trucks, buses, construction machines and other heavy-duty vehicles that covers the whole repair process through the use of special diagnostic laptop with configured diagnostic software. It was developed to make repair shop tasks easier and more efficiant.
Vocom tool offers complete range of diagnostic operations for Volvo heavy duty vehicles made since 2002 year with available high speed connection to the ECU via high quality cable. For older Volvo vehicle models made in year 1998 or earlier all diagnostic operations available through usual, slower connection to the ECU. This tool replaces older Volvo diagnostic tool – VCADS 88890180, but keeps all functionality. Only genuine Vocom interface can work via Wi-fi (supports 802.11 wireless connectivity), compatible with newest vehicles and is water resistant.
This diagnostic tool is designed with focus on robustness and durability to withstand the tough workshop environment. This is the most recent adapter from Volvo, and replaces all old adapters including 88890180 and 88890020.
The set of plug-ins, user authorizations, and available languages is adjustable to provide every user with what they need. Volvo 88890300 Vocom Interface also provide functions for parameter change with developer tool, communication with the product, and other external applications. Premium Tech Tool provides access to vehicle and parameter programming, service information, diagnostics, tests and calibration.
FEATURES
Electrical Wiring Diagrams – FM, FH, FL, FE
Development access – configure more than 11000 parameters of ANY level without any restrictions (APCI)
For example:
Minimum/maximum values like speed limit
Chassis ID Change
Injector programming
EURO 6 configurations available
Clutch calibration
And many more
COVERAGE
Spare parts catalogs – for construction, trucks, marine. MATRIS, IMPACT, PROSIS.
Package
Volvo 88894000 Vocom II truck diagnostic tool
Volvo 88890304 OBD2 cable
Volvo 88890306 8-pin cable
Volvo 88890305 USB cable
Included refurbished business class laptop prepared to use with diagnostic tool