Well, after buying lots of Xentry Connect
and working with them, I realized, man they are slow as shit, from
booting up the interface, to appearing in xentry control, to opening up
xentry, lots of time, this is because it is not like china clones, or SD Connect (C4), or VCI (C6)
which are normal interfaces not a whole computer like Connect, so I
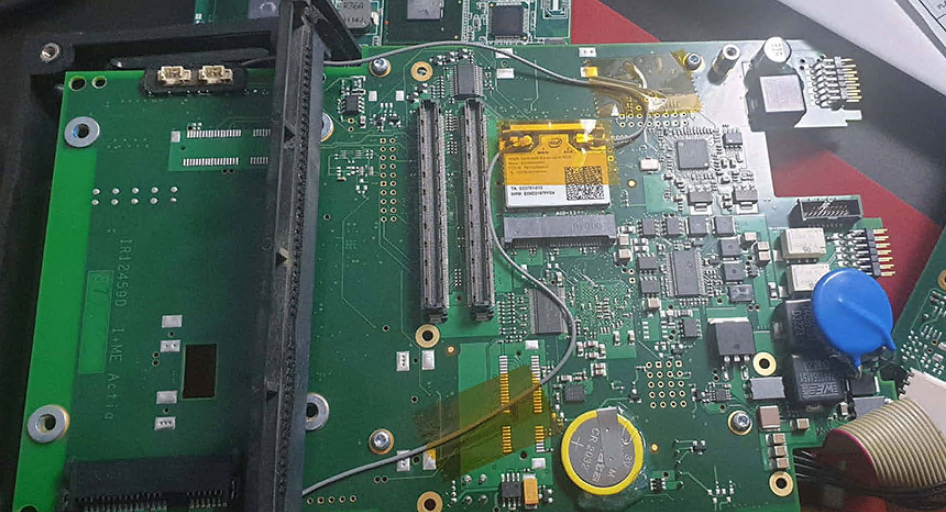
managed to completely disassemble the interface and see if it is
possible to do something about it.
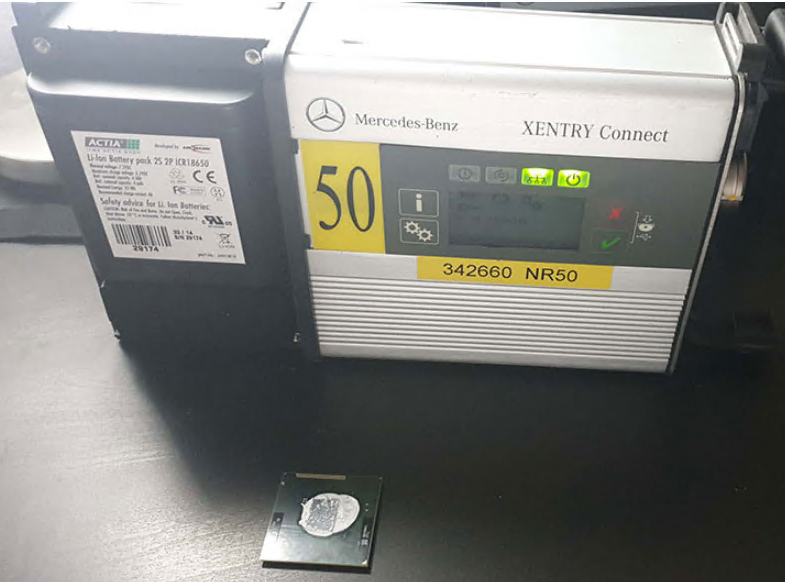
So, this interface or minicomputer has the following:
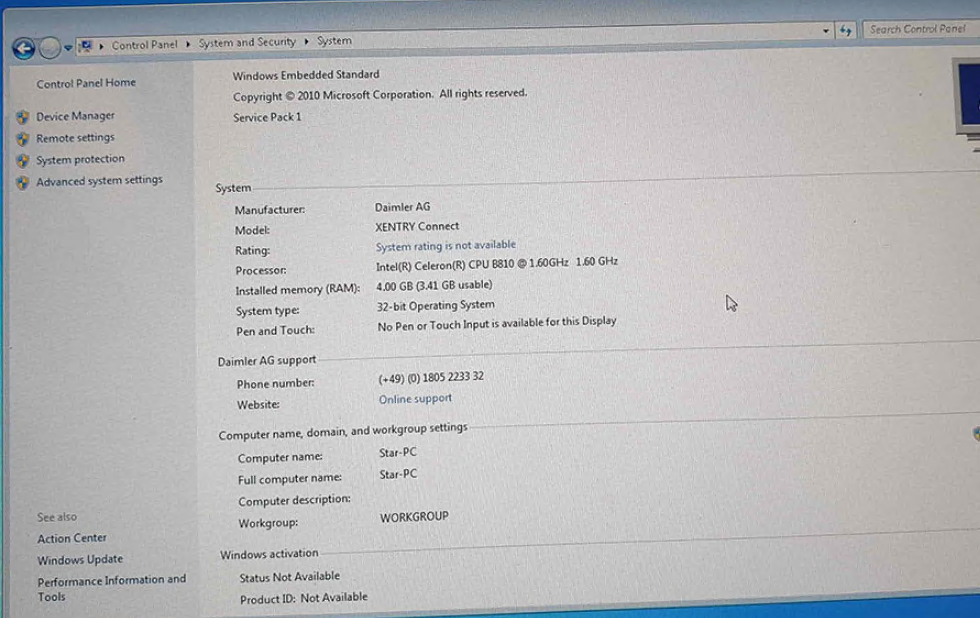
OS: Windows 7 32bit Embedded
MB: HM65 Chipset
CPU: Intel Celeron B810 2 cores 2 threads 1,6Ghz 35w, 2mb L3 cache,
PGA989 (2nd gen) this is the biggest issue, cheap shit processor
GPU: Integrated obviously
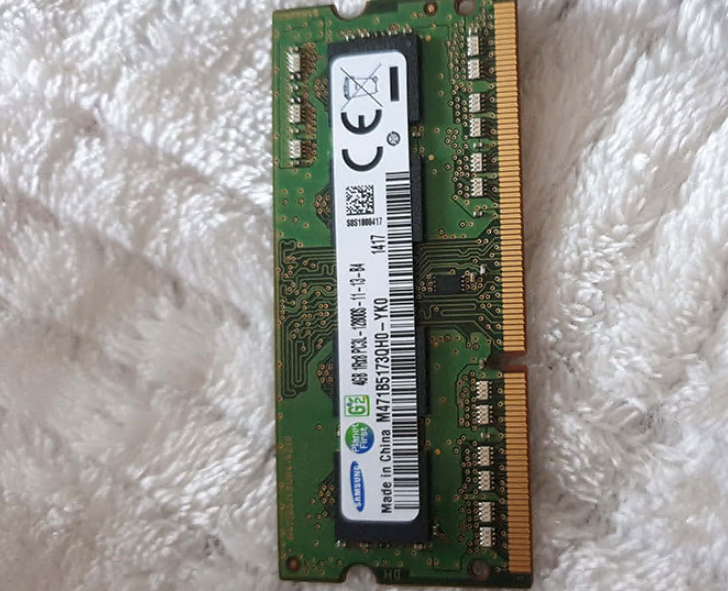
RAM: 4Gb Samsung DDR3 1333Mhz, can’t put 8gb because windows is 32bit so limited to 3,5Gb
SSD: Xmore quality 256GB
WiFi: Intel Centrino Advanced-N 6205 2,4Ghz and 5Ghz 300mbps PCIe Half MiniCard not wow but decent
it has a USB dongle into the board, it is 4Gb, no idea what this is
This device is in testing/development at least since 14/07/2011, first versions appeared in at least 2012
I encountered 2 versions of this ssd, 1 with 238GB found on XC older than 2014, 1 with 223GB found on XC newer than 2015
Upgrade: change that celeron cpu to something better, I personally
changed it to i7 2640m 2 cores 4 threads 2,8Ghz 3,5Ghz 4Mb cache 35w
From starting xentry program until Data status 2020/06 appeared
Celeron: 57 Seconds
I7 2640m: 25 Seconds
From Sleep mode to No car connected
Celeron: 47 Seconds
I7 2640m: 37 Seconds
MUCH FASTER in Xentry program!!!
The reason why I choose the i7 2640m is because it is the most powerful
2nd gen processor of 35W (VERY IMPORTANT), more watts mean more heat,
and the interface only has 1 small radiator and 2 small ventilators
(like a laptop), i wouldn’t risk for right now putting a better
processor as i’m afraid it will not cool as it should, it will overheat
Tried a 2670qm (4 cores 8 threads) and the interface shuts down, not
temperature problem but watt consumption problem, motherboard can’t
deliver enough power and shuts down even ventilators completely, so
maximum i recommend 2 cores 4 threads
Also, it is possible to install 3rd gen processors but motherboard
doesn’t support 3rd gen processors even doe it is the same socket
PGA-989
Check attachment regarding Compatible processors for 2nd gen
INSTALL:
1. Take out battery
2. Take out shield from Backside of Xentry Connect, it has double side addesive
3. Unscrew the 6 screws from radiator
4. Take out radiator
5. Turn the small black protection
6. Change cpu with NEW thermal paste
7. Put all back and that’s it
SSD: You could try putting a better ssd, space is enough actually
more than needed for only Xentry, it’s ok for Vediamo, WIS/EPC, Monaco
etc.
Couldn’t find any data or performance stats for this ssd, never heard
about this company, you can clone this ssd with another one and try
Ram: 4Gbs is max for 32bit, even more, no reason to put more than 4Gb
ram, only if you somehow manage to install windows 7 embedded on 64bit
WiFi: Looked for the Intel AC-7260 but it is said it is buggy as
hell, also you need to change drivers for the wifi card, which is kinda
complicated, you can install driver booster on the interface’s windows
(through remote desktop connection) and install driver from the wifi
card you install
It supports USB 2.0, 3.0 and 3.1
SOFTWARE:
1.1 Xentry Tab (Part of Xentry Kit 2)
This is the software that you will have on your laptop
1.2 Options:
1)Download separately Xentry Tab from attachment you have there Setup, open and install
2)Skip to 2.1 and install from Xentry Kit 2 folder, you have there Setup, open and install
2.1 Xentry Connect (Part of Xentry Kit 2)
I highly recommend to update interface to latest Xentry, which is
2020.06 also there will not be a newer Xentry for this interface, need
to buy kit 3 or 4
1. Link is in the attachment, download KIT2 06-2020 Final Edition
2. Extract with 7zip and copy the folder and put it on a minimum 32Gb USB Stick or External SSD/HDD
3. Installing the release update on the XENTRY Connect
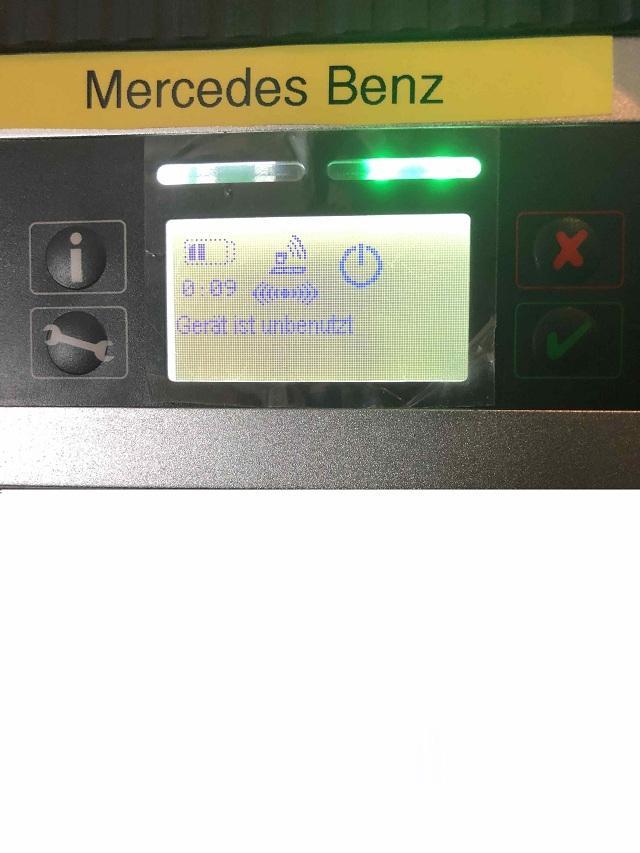
Please note: The XENTRY Connect must be in standby mode to install the release update. You can shut down the XENTRY
Connect directly on the device via the menu (gearwheels button) or from the XENTRY Control session.
4. Connect the power supply unit to the XENTRY Connect and insert the
USB data storage medium into a free USB port of the XENTRY Connect.
5. Now start the update mode of the XENTRY Connect by simultaneously pressing the two “red cross” and “green tick”buttons.
6. Once “Start update” appears on the display, confirm this with the
green tick. The update procedure starts. This will be indicated as
follows on the XENTRY Connect display:
The USB update takes about 100 minutes. The XENTRY Connect indicates when the update is finished on the display.
7. You can complete the process by pressing the “gearwheels” button.
Or, wait until the XENTRY Connect automatically shuts down (approx. 10
minutes after the picture appears on the display).
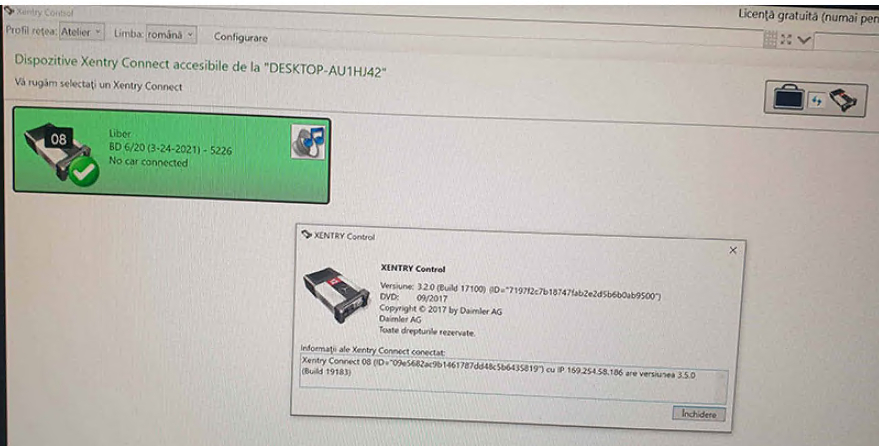
2.2 Configuration from Xentry Control
1. Start the interface
2. Connect LAN cable to interface and laptop
3. Open Xentry Control and in the top section open configuration
4. Go step by step with lan and wifi and others bla bla
2.3 Xentry License/StartKey
In case your Xentry Connect has expired license, 99% chance because
dealership started to use kit 3 from 2018/06, can check by opening
StartKey Center or Xentry (No Acces authorization code), then you need
to activate license
For this, i’m not publishing for free solution, contact me if needed, activation is 100 Euros
Problems/Issues/Errors:
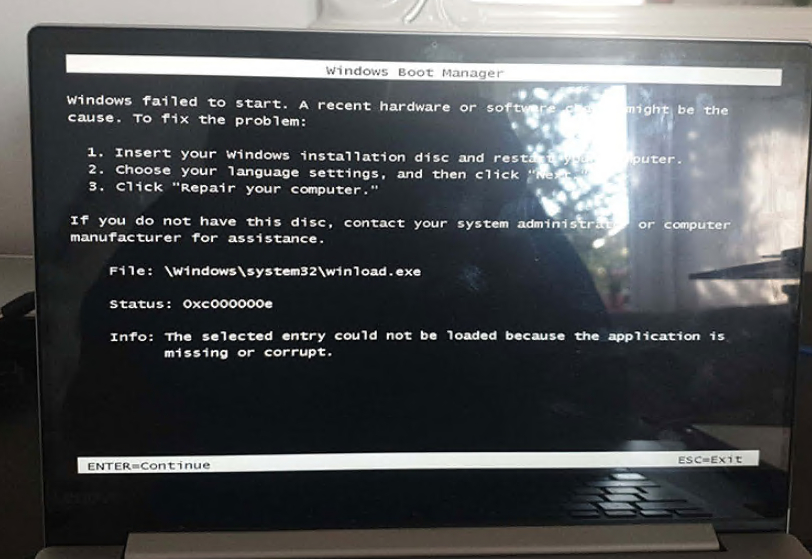
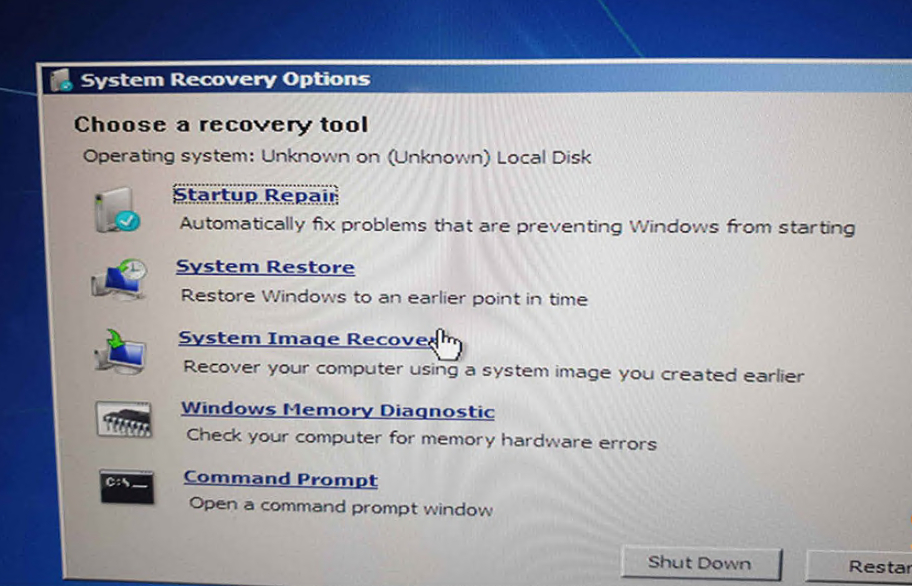
In case you have Device is booting/Update (when not updating) for looong time, more than 3 minutes
1. Make NORMAL not embedded Windows 7 32bit NOT 64bit USB bootable drive, minimum 4Gbs
In case you have new laptop with USB 3.0 and you have no mouse in
Windows 7 install setup, you need to integrate USB 3.0 Drivers into
Windows 7 ISO with NTLite, check youtube
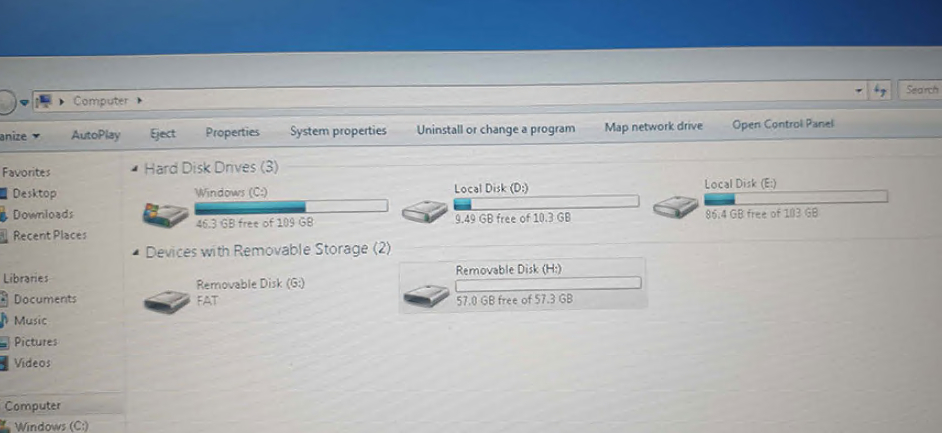
2. Take out SSD from Xentry Connect
3. Connect to laptop, or if you have older laptop install in laptop
4. Connect USB Stick with Windows Embedded 7 32bit
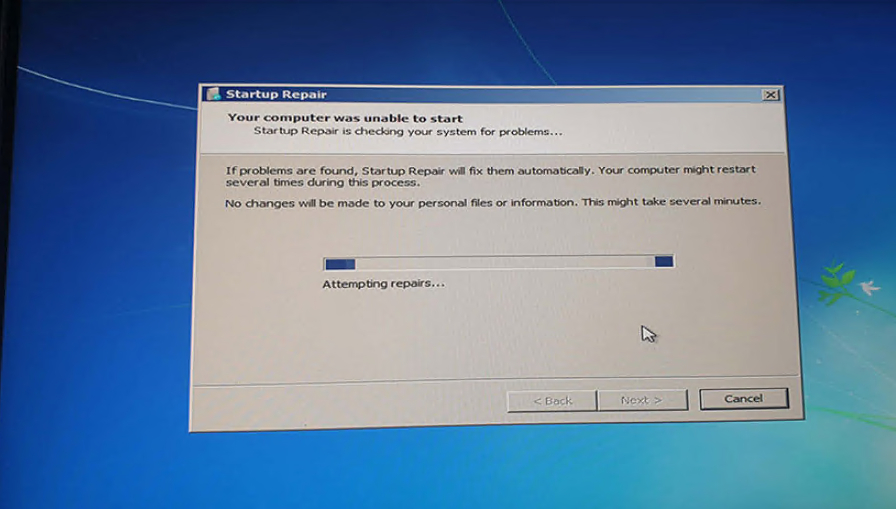
5. Select Language, Repair my computer
6. Select Startup Repair, let it do it’s thing
7. Insert SSD back to Xentry Connect and done
VERY IMPORTANT, PUT AT LEAST 1 SCREW to hold SSD to not move, if it
moves you will corrupt BCD again (not booting, update/device is booting
for long time, jump to 2)
If you have update error, doesn’t matter what error:
1. Open Support Tool
2. Go to Reset
3. Check I have spoken to the Diagnosis UHD and would like to reset the Xentry Connect
4. Click Setting up USB data media
5. Select USB stick (file that will be on USB stick is 1.6KB so insanely small)
6. Insert USB stick into XC
7. Press Tick (Green) and X (Red) at the same time (while in Sleep mode)
8. Let it to it’s Reset (x/15)
9. Perform Update with 2020/06
Only the display is lighting up but no text can be from multiple
causes, internal defect, missing hardware display files, bios chip
fucked etc.
If you don’t want to change cpu which would be a stupid decision, at
least take off the back cover, A LOT of dust accumulated over the years
can be there and it is blocking cooling very badly (see picture
attached)
OPTIONALLY
DAS Standalone
Vediamo 05.01.01
WIS 2020.04 (after 2020.04 xentry connect no longer supported), i tried
copying missing files from 2020.04 to 2020.10 but it doesn’t work and
it’s not that simple)
DTS Monaco 8.16
https://www.cnautotool.com/goods-7044-MB-SD-Connect-C5-Star-Diagnostic-Tool-Lenovo-T450-Laptop-Vediamo-DTS-Engineering-Software.htm
Well, after buying lots of Xentry Connect
and working with them, I realized, man they are slow as shit, from
booting up the interface, to appearing in xentry control, to opening up
xentry, lots of time, this is because it is not like china clones, or SD Connect (C4), or VCI (C6)
which are normal interfaces not a whole computer like Connect, so I
managed to completely disassemble the interface and see if it is
possible to do something about it.
So, this interface or minicomputer has the following:
OS: Windows 7 32bit Embedded
MB: HM65 Chipset
CPU: Intel Celeron B810 2 cores 2 threads 1,6Ghz 35w, 2mb L3 cache,
PGA989 (2nd gen) this is the biggest issue, cheap shit processor
GPU: Integrated obviously
RAM: 4Gb Samsung DDR3 1333Mhz, can’t put 8gb because windows is 32bit so limited to 3,5Gb
SSD: Xmore quality 256GB
WiFi: Intel Centrino Advanced-N 6205 2,4Ghz and 5Ghz 300mbps PCIe Half MiniCard not wow but decent
it has a USB dongle into the board, it is 4Gb, no idea what this is
This device is in testing/development at least since 14/07/2011, first versions appeared in at least 2012
I encountered 2 versions of this ssd, 1 with 238GB found on XC older than 2014, 1 with 223GB found on XC newer than 2015
Upgrade: change that celeron cpu to something better, I personally
changed it to i7 2640m 2 cores 4 threads 2,8Ghz 3,5Ghz 4Mb cache 35w
From starting xentry program until Data status 2020/06 appeared
Celeron: 57 Seconds
I7 2640m: 25 Seconds
From Sleep mode to No car connected
Celeron: 47 Seconds
I7 2640m: 37 Seconds
MUCH FASTER in Xentry program!!!
The reason why I choose the i7 2640m is because it is the most powerful
2nd gen processor of 35W (VERY IMPORTANT), more watts mean more heat,
and the interface only has 1 small radiator and 2 small ventilators
(like a laptop), i wouldn’t risk for right now putting a better
processor as i’m afraid it will not cool as it should, it will overheat
Tried a 2670qm (4 cores 8 threads) and the interface shuts down, not
temperature problem but watt consumption problem, motherboard can’t
deliver enough power and shuts down even ventilators completely, so
maximum i recommend 2 cores 4 threads
Also, it is possible to install 3rd gen processors but motherboard
doesn’t support 3rd gen processors even doe it is the same socket
PGA-989
Check attachment regarding Compatible processors for 2nd gen
INSTALL:
1. Take out battery
2. Take out shield from Backside of Xentry Connect, it has double side addesive
3. Unscrew the 6 screws from radiator
4. Take out radiator
5. Turn the small black protection
6. Change cpu with NEW thermal paste
7. Put all back and that’s it
SSD: You could try putting a better ssd, space is enough actually
more than needed for only Xentry, it’s ok for Vediamo, WIS/EPC, Monaco
etc.
Couldn’t find any data or performance stats for this ssd, never heard
about this company, you can clone this ssd with another one and try
Ram: 4Gbs is max for 32bit, even more, no reason to put more than 4Gb
ram, only if you somehow manage to install windows 7 embedded on 64bit
WiFi: Looked for the Intel AC-7260 but it is said it is buggy as
hell, also you need to change drivers for the wifi card, which is kinda
complicated, you can install driver booster on the interface’s windows
(through remote desktop connection) and install driver from the wifi
card you install
It supports USB 2.0, 3.0 and 3.1
SOFTWARE:
1.1 Xentry Tab (Part of Xentry Kit 2)
This is the software that you will have on your laptop
1.2 Options:
1)Download separately Xentry Tab from attachment you have there Setup, open and install
2)Skip to 2.1 and install from Xentry Kit 2 folder, you have there Setup, open and install
2.1 Xentry Connect (Part of Xentry Kit 2)
I highly recommend to update interface to latest Xentry, which is
2020.06 also there will not be a newer Xentry for this interface, need
to buy kit 3 or 4
1. Link is in the attachment, download KIT2 06-2020 Final Edition
2. Extract with 7zip and copy the folder and put it on a minimum 32Gb USB Stick or External SSD/HDD
3. Installing the release update on the XENTRY Connect
Please note: The XENTRY Connect must be in standby mode to install the release update. You can shut down the XENTRY
Connect directly on the device via the menu (gearwheels button) or from the XENTRY Control session.
4. Connect the power supply unit to the XENTRY Connect and insert the
USB data storage medium into a free USB port of the XENTRY Connect.
5. Now start the update mode of the XENTRY Connect by simultaneously pressing the two “red cross” and “green tick”buttons.
6. Once “Start update” appears on the display, confirm this with the
green tick. The update procedure starts. This will be indicated as
follows on the XENTRY Connect display:
The USB update takes about 100 minutes. The XENTRY Connect indicates when the update is finished on the display.
7. You can complete the process by pressing the “gearwheels” button.
Or, wait until the XENTRY Connect automatically shuts down (approx. 10
minutes after the picture appears on the display).
2.2 Configuration from Xentry Control
1. Start the interface
2. Connect LAN cable to interface and laptop
3. Open Xentry Control and in the top section open configuration
4. Go step by step with lan and wifi and others bla bla
2.3 Xentry License/StartKey
In case your Xentry Connect has expired license, 99% chance because
dealership started to use kit 3 from 2018/06, can check by opening
StartKey Center or Xentry (No Acces authorization code), then you need
to activate license
For this, i’m not publishing for free solution, contact me if needed, activation is 100 Euros
Problems/Issues/Errors:
In case you have Device is booting/Update (when not updating) for looong time, more than 3 minutes
1. Make NORMAL not embedded Windows 7 32bit NOT 64bit USB bootable drive, minimum 4Gbs
In case you have new laptop with USB 3.0 and you have no mouse in
Windows 7 install setup, you need to integrate USB 3.0 Drivers into
Windows 7 ISO with NTLite, check youtube
2. Take out SSD from Xentry Connect
3. Connect to laptop, or if you have older laptop install in laptop
4. Connect USB Stick with Windows Embedded 7 32bit
5. Select Language, Repair my computer
6. Select Startup Repair, let it do it’s thing
7. Insert SSD back to Xentry Connect and done
VERY IMPORTANT, PUT AT LEAST 1 SCREW to hold SSD to not move, if it
moves you will corrupt BCD again (not booting, update/device is booting
for long time, jump to 2)
If you have update error, doesn’t matter what error:
1. Open Support Tool
2. Go to Reset
3. Check I have spoken to the Diagnosis UHD and would like to reset the Xentry Connect
4. Click Setting up USB data media
5. Select USB stick (file that will be on USB stick is 1.6KB so insanely small)
6. Insert USB stick into XC
7. Press Tick (Green) and X (Red) at the same time (while in Sleep mode)
8. Let it to it’s Reset (x/15)
9. Perform Update with 2020/06
Only the display is lighting up but no text can be from multiple
causes, internal defect, missing hardware display files, bios chip
fucked etc.
If you don’t want to change cpu which would be a stupid decision, at
least take off the back cover, A LOT of dust accumulated over the years
can be there and it is blocking cooling very badly (see picture
attached)
OPTIONALLY
DAS Standalone
Vediamo 05.01.01
WIS 2020.04 (after 2020.04 xentry connect no longer supported), i tried
copying missing files from 2020.04 to 2020.10 but it doesn’t work and
it’s not that simple)
DTS Monaco 8.16
https://www.cnautotool.com/goods-7044-MB-SD-Connect-C5-Star-Diagnostic-Tool-Lenovo-T450-Laptop-Vediamo-DTS-Engineering-Software.html